This post details how to build an easy DIY pergola on a concrete patio, with a modern wood slatted privacy wall!
Okay friends, if you’re looking for an easy way to upgrade your backyard then a DIY pergola is it! We (mainly my husband, ha) built this pergola on our concrete patio last summer and it is by-far my favorite DIY project we’ve ever done. It completely transformed the look and feel of our backyard and patio space.
It might look intimidating but this project was so much fun and I know just how much it enhances an outdoor space. This easy DIY pergola can be done on a budget and can work with a variety of different layouts.
Below I’m sharing all the details on how to build a pergola, including our DIY pergola plans.
Why We Decided to Build a Pergola On a Patio:
Our house has a very small yard, and the houses are close together, so there was NO privacy when we moved in. We live in a new-build community so the trees are also still very small and don’t provide shade or privacy yet.
The back of our house is southern facing, so it is always sunny and hot in the summer months. Without a form of shade it was really hard to use this space. But having two toddler boys, I needed a protected spot to hang out outside with them!
The wind can also be very strong where we live, so we have had a hard time figuring out a shade solution. We’ve tried umbrellas (with very heavy bases), a free-standing pergola (again weighted down), and non-structural shade awnings. Nothing could withstand the wind!
We tried so hard to find a good budget shade option but nothing worked well. Looking back I really wish we would have bit the bullet and built the pergola right away. We tried out three other ideas, and ended up waisting hundreds of dollars, before deciding to learn how to build a pergola.
Building this DIY pergola on the concrete patio definitely paid off! With the help of my husband’s brother, we were able to finish this project over the course of two weekends! It went up much quicker than I thought it would, and was much less expensive to build ourselves!
This is a DIY project that I would recommend to anyone looking to add some shade and privacy to their backyard, while increasing their home’s value!
EDIT March 2023: We moved a couple of years ago and this pergola is what I miss the most about this house! However, it definitely helped our house stand out when we went to sell it. Every showing we had commented on how much they loved the pergola! It added so much to our small backyard. The backyard would have been a hard selling point without it. But with it, it was one of the best features! So, if you are looking to increase your home’s retail value, I highly suggest this project!

This post contains affiliate links; see our Disclosure here.
How to Build a Pergola on a Patio with Wood Slat Privacy Screens
Step 1 – Research Pergola Design Inspiration
Before starting this pergola project, I did a ton of research! Pinterest is always my go-to search engine when beginning a project!
I looked at so many different styles and sizes and ideas. Pergolas that were free-standing vs. attached to the house … Pergolas with a traditional design style vs. more modern styles … Cedar vs. Red Wood vs. Pressure Treated Wood …
I also looked into a few different package options. Some companies, like Home Depot, sell DIY Pergola Kits where they will send you the pre-cut pieces and you can then put it together. They also of course offer professional pergola installation.
I can tell you that the price to pay for the professional installation would have been at least 3x’s more than what we ended up paying! Even the pre-cut kits were much more expensive.
I decided on a few key elements that I wanted to include in our pergola plans…
Must Have Pergola Design Details:
- Build with Cedar Wood (Western Red Cedar)
- Cedar is a very durable and strong wood. We live in Colorado, where the sun is very strong and the humidity is low, so we needed a wood that can withstand the harsh elements here.
- It is also naturally rot and insect resistant, so it is not typically treated with harmful chemicals like some other wood species. Finding a non-toxic material was important to us!
- I also love how cedar looks when it naturally ages. Cedar wood starts out with a red-yellow tone and turns to a beautiful silvery-gray as it patinas.
- The other wood option that we considered was Redwood. It is very similar to cedar but has a darker red-brown tone, and the wood grain tends to be more subtle and less rustic. We choose cedar because we liked the lighter color and how turns gray when it ages.
- Use 6×6 Beams for the Main Posts
- While 4×4 beams are more readily available, it was important to me to use 6×6 beams. Because the overall size and scale of this pergola was going to feel big, I didn’t want the scale of the posts to feel too small and flimsy. The scale of the 6×6 beams feels much more custom and in proportion to the rest of the pergola.
- Use One Large Header (4″W x 10″H) vs. Two Thinner Boards
- I saw a few pergola images where they used two thinner boards along the top header instead of one thicker board. Again, I feel the thicker board feels more custom and in proportion to the rest of the structure.
- Simple and Clean Design
- I didn’t want anything too ornate, but also not too modern. The style of our house is kind of a cottage/farmhouse style on the exterior, so I wanted it to match that. We choose a very simple angled detail for the end of the header and planks on the top of the pergola.
- Narrow Spacing Between the Top Boards
- Because our back yard receives SO MUCH sun, we wanted to create as much shade as possible. We spaced the top large planks with the angled ends about 10″ apart, and the top 2″ x 2″ pieces were spaced about 6″ apart.
- This was another reason I was happy we built this pergola ourselves! I was shocked how much the price went up for the kits and the installed pergolas when you added more of these top boards. These pieces were very inexpensive to buy more of, and easy to add, so we could space them closer together.
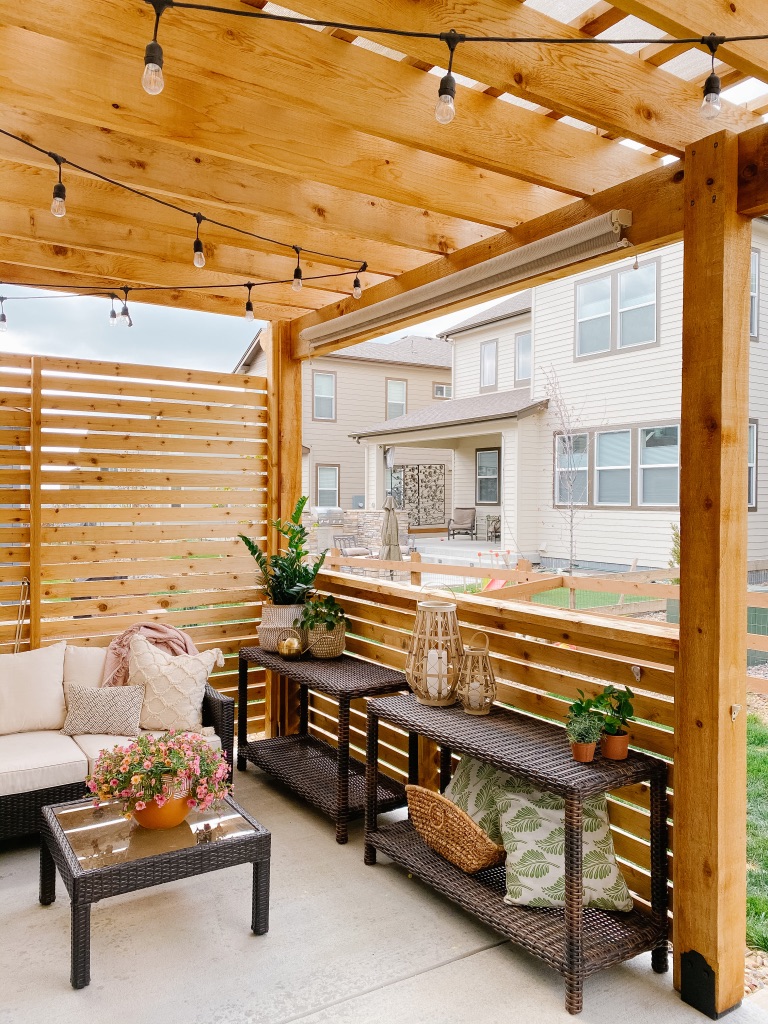
- Wood Slat Privacy Screen and Half Walls
- I love that we were able to add these! Not only do they provide extra shade and privacy, they look so good! The wood slats make this pergola stand out from others and are a custom look that was easy to add on.
- Future Plans – I had dreamed of adding planter boxes or crawling vines or scattered succulents to these privacy screens, but we moved before I was able to. I think that would have been so pretty though!
- I’ve also seen a few different styles of these wood slat screens where people do different board widths or spacing between the boards…there are a lot of fun design options for this feature!
Step 2 – Measure and Draw Pergola Plans
Once we had a design concept in mind we measured our patio space to determine how big we wanted the pergola to be, where we wanted to add the privacy walls, and how high we wanted it to go.
We decided to have it cover our whole existing concrete slab. The concrete slab is approximately 19′-6″ wide x 10′-6″ deep.
We wanted the roof of the pergola to hit just above the top of our windows. The top of the windows are about 9′ high.
After that, I sketched out how we wanted it to look. I drew the floorplans and elevations to scale. This way we were able to determine how many boards we needed and what types. Figuring out what to order was the hardest part of this project!
NOTE: We did update a few measurements / pieces when we ordered the wood, which I will note below.
Step 3 – Order Pergola Materials
Because we wanted cedar, and some custom sizes, we ordered the following supplies from a local lumbar yard. By ordering from a lumbar yard versus going to Home Depot, we were able to get the exact type of wood we wanted and the exact sizes.
I’m so glad we did because we were able to order custom sizes for the lengths and widths that we needed. This saved us so much time and labor once we received the lumber because we had to make fewer cuts.
It only took about a week for the pieces to arrive and then we had them delivered straight to our house for a very reasonable fee! Again…highly recommend using a local lumbar yard! You are also supporting a small business so it’s a win win!
Materials Ordered:
* These quantities and sizes will vary based on your pergola design and overall size *
- 3 – 6″ X 6″ X 10′ Rough Sawn Appearance Cedar (main structural beams)
- 1 – 4″ X 10″ X 10′ Rough Sawn Appearance Cedar (main front header beam)
- 1 – 4″ X 10″ X 12′ Rough Sawn Appearance Cedar (main front header beam)
- 7 – 2″ X 6″ X 10′ Rough Sawn Appearance Cedar (we cut these into 2″ x 2″ pieces for the top boards)
- 7 – 2″ X 6″ X 12′ Rough Sawn Appearance Cedar (we cut these into 2″ x 2″ pieces for the top boards)
- 37 – 1″ X 4″ X 12′ Cedar (Wood Slats for Privacy Walls)
- 16 – 2″ X 10″ X 12′ Rough Cedar (top planks with angled ends and header boards attached to house)
- 2 – 2″ X 4″ X 8′ Rough Sawn Appearance Cedar (top of half height privacy wall)
- 2 – 2″ X 4″ X 10′ Rough Sawn Appearance Cedar (to frame/support privacy walls)
- Metal Flashing
- Metal Brackets
- 3 – Black Post Bases with Black Screws
- Concrete Anchors
NOTE: we ended up using 1″ x 4″ boards for the privacy wall instead of 1″ x 6″, and left a 1″ gap in between each board.
Step 4 – Build Pergola on Concrete Patio
The first step was to install the 3 6″ x 6″ posts into the concrete slab. This was the hardest part! The beams were very heavy and it took 2-3 people to hold them in place to make sure they were level and straight.
After that, we installed the large header at the front. This was another tricky part that took two people. One person to hold the beam up while the other screwed it into the 6″ x 6″ posts.
Also, as you can see in the below photo, we notched out a spot at the tops of the 6″ x 6″ posts for the header to rest on.
The next step was to install the support boards and metal flashing to the house. The metal flashing is an important step to keep water from collecting on the wood, which could damage the siding on your house.
After those steps, my husband was able to add the pieces on the roof on his own.
The last step was to add the wood slats to the privacy screens.
We decided not to seal or stain the cedar because we want it to age naturally. When cedar ages it grays over time and I love the color it turns!
Step 5 – Add Finishing Touches
A few finishing touches we added were some sun shades! We added two of these outdoor roller shades, seen above, which help so much to block the sun! They are easy to use and are not very noticeable when up. They also add even more privacy and when they are down this area feels like a private outdoor room.
We also added a couple of sail sun shades to lay on the top of the pergola. They added more shade, protection from rain, and were barely noticeable. We used carabiner clips to attach them so they were easily removable in the winter. We took them off then so snow wouldn’t collect on them.
Then we added some decorative outdoor globe string lights! I’ve always loved the look of these lights! They feel magical and were perfect when we were outside at night!
One thing to note that we weren’t prepared for – the first few times the cedar wood gets wet (when it rains or snows) the water that drips off can be red and stain the furniture or concrete below. We were able to rinse it off of our cushions with a pressure washer, but it is something to be aware of!
If you seal the wood this wouldn’t be an issue. Otherwise I would recommend rinsing the wood off with a pressure washer (at a safe distance) one or two times before placing furniture underneath it.
My Favorite Patio Furniture Options from 2023:
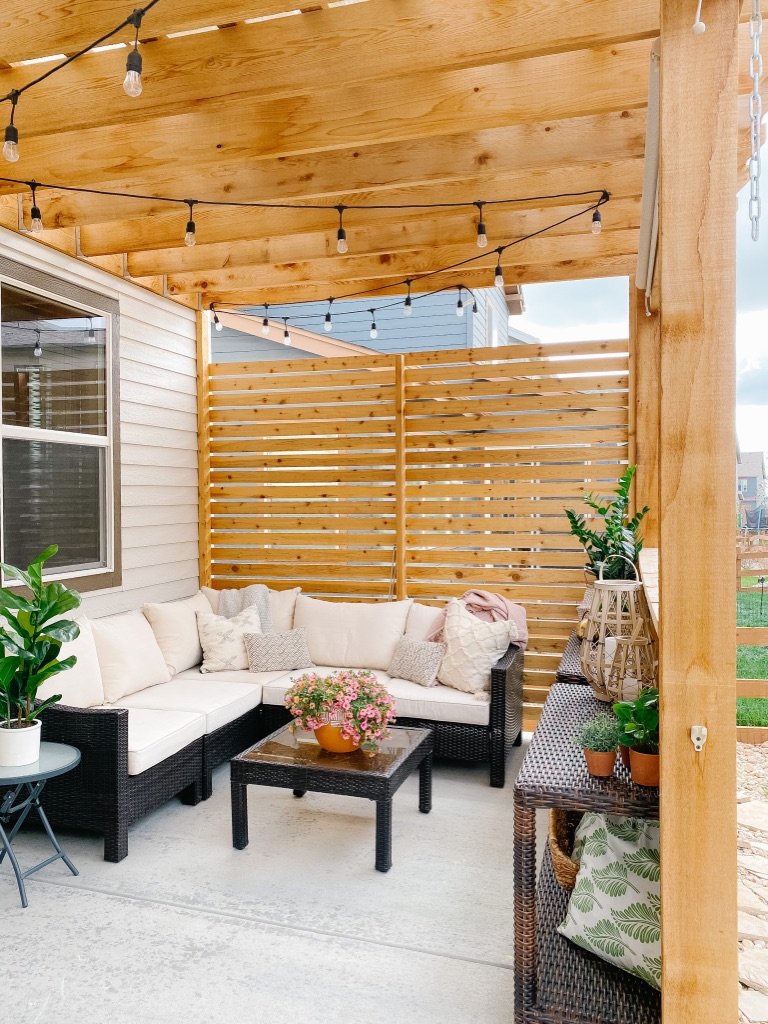
Of course we also added some nice patio furniture! I love our outdoor sectional and how cozy the seating area is! Our exact one isn’t available anymore but this outdoor sectional from Wayfair is similar! Or this large outdoor sectional looks like a great option too!
I’ve put together an outdoor patio furniture round-up here if you are looking for more seating options!
Final Thoughts on Our DIY Pergola and Privacy Screens
I’m so happy with how our pergola and privacy walls turned out on our patio! This pergola adds to much to the look and feel of our small backyard!
It provides us with so much more shade and privacy! I love how our concrete patio space now feels like an extension of our house and more like an outdoor room. We use it all of the time. It is even nice in the winter because it blocks some of the snow from the patio!
Hopefully these DIY Pergola Plans help you if you are planning to build your own pergola on a patio! I highly recommend this project as it saved us so much money and was really not that hard to do! As long as you have a few guys to help lift the heavy beams, it is a pretty easy DIY project!
Please leave a comment below if you have any questions!
If you are looking for another DIY project to tackle, take a look through our DIY Page! We have posted a lot of simple and budget friendly projects!
This post was all about How to Build a Pergola on a Patio with Wood Slat Privacy Screen Plans!
More Outdoor Decor and DIY Articles:
- The Best Outdoor Patio Furniture
- Backyard Makeover with DIY Propane Fire Pit
- Front Porch DIY Wood Ceiling
- How to Build Banquette Seating
- How to Cover a Popcorn Ceiling with Shiplap
- How to Make an Easy DIY Fireplace Mantel
So beautiful! Love it!
I love the wood privacy it came out great. My friend moved to Castle rock from NYC in 2019 I visited in 2020. Where are you in Colorado? she told me the sun is very strong and burns the grass. She has a beautiful front deck.
Thank you !his house was NW of Denver. Yes the sun is very strong here!
I’ve been thinking about replacing our deck with a pergola for some time. I really like your design. I have two questions:
1. What do you think of louvres instead of slats?
2. If you don’t mind me asking, what was the cost of your materials?
Thanks! I like louvres but think they would be more expensive. I believe I shared what the materials cost in the post, but this was about 4 years ago so I’m sure prices are different now.
I absolutely love this! It is so beautiful! And thank you for posting your plans! Plans are so hard to find! Do you know approximately how much this whole thing cost to build?
Thank you so much! I just updated this post with more details too! I think it all cost us about $3,500! Much less expensive then paying for it to be professionally installed!
This is beautiful! I really like the privacy walls.
We’re in the process of designing a deck and pergola to go on top We’re getting quotes of over $40k so I’m trying to see where we can save money by doing some of it ourselves. We would have to submit plans and get a permit for it. How much of a pain was getting your permit, was it expensive, and how long did that take?
Also, do you ever have to worry about mosquitos?
Thanks!
Thank you!
We didn’t have to submit a permit to the city to build this, only to our HOA, which was easy! It cost us about $3500 – 4000 total to build this…so much less expensive than the quotes we had for someone to build it!
And no we don’t really have many mosquitos here in CO.
Hi! This is exactly what I’ve been searching for, so thank you!! Do you have any pictures of how you attached the shade sails? Did you have any issues with wind causing your sails to flap? I’ve seen other people use a ratcheting system to get the sails taut. I’m just curious what worked for you. We’re in an area with high wind as well with a south facing backyard. A permanent, attached structure is our best option for shade but I don’t want to lose all my beautiful winter sunshine. So a pergola with shade sails is a great option because with can take the sails down in the winter. Thank you in advance.
I’m glad it’s helpful! I can’t find any photos of it, but basically we used a rope to make a hoop at each corner of the sail, and then stretched it to attach to carabiners so the sail was tight. We lived in a super windy area and didn’t have any issue with it!
Did you use a water proof shade or the exact one you linked above? Did it protect you from rain pretty well or did you wish you had used a water proof one?
It wasn’t waterproof but kept most of the water out and protected the sofa. It would have been nice to have something that was 100% waterproof though!
I love the privacy walls. I just had a pergola built last fall. Can you tell me how you added the privacy walls? I’m thinking you can just screw a vertical support, maybe a 2×4 onto header at the proper distance and then screw the horizontal slats into that? Any suggestions would be greatly appreciated!
Hi! For the privacy walls, we screwed a 2×4 directly on the the side of the house, and then another into the 6×6 beam, and then attached the 1×4 wood slats directly to that! There is also a 2×4 that goes up the middle of the privacy wall for added support. Hopefully that makes sense but let me know if you have other questions! You can see the 2×4’s in a few of the photos.
Hi! Love it, great job. I am building a railing for my deck similar to your privacy wall using 1×4 pressure treated (pine instead of cedar). What type of fastener/screw did you use when attaching the 1×4? I’ve tested using the same screws i used for screwing into thicker deck board pieces but that seems to cause quite a bit of splitting on the 1×4. Thanks!!
Hi! Thank you! I’m pretty sure we used these screws – https://www.homedepot.com/p/DECKMATE-8-x-1-1-4-in-Star-Drive-Flat-Head-Wood-Screws-1-lb-Box-114DMR1/305418756
I am looking for some pergola ideas and yours are just lovely!
Just a question about the sun shades on top of the pergola you mentioned in “add finishing touches”. I couldn’t see any picture of it. What kind of sun shades did you use?
Hi, Thanks so much! These are similar to the sun shades we used on the top – https://rstyle.me/+qalq9j_TfqyvRumuNJ_XzA
This is what I’m looking for! We live in Southeast Wyoming so all too familiar with how wicked the wind can be. Our patio faces east so it would shade the early sun, but having the wind breaks to the north and south would be a win! Thanks for sharing.
I’m so glad it was helpful!
Hey there! We’ve designed a pergola to look just like yours! Can you tell me how you secured the ledger board to the house? Did you remove some siding or just attach it over the siding?
Hi, sorry for the delay! We did remove the siding to install the ledger board! Great question; I’ll have to add that in the post!
I just love this pergola and the choices you made including the privacy walls, finishing touches, angled beams at top, etc!! I was wondering if you found the natural light in your house minimized a lot or at all with the addition of the pergola? We are in the planning process for ours, and like you, it will be directly over/ in front of our patio doors and back window. I’m concerned about losing natural light.
Thank you so much! It didn’t really affect the natural light in this house because the living room inside had 2 story (about 20′ high) ceilings with a lot of high windows. In our current house we have a covered patio outside of our family room and it does limit the natural light coming in. A pergola would allow more than a covered patio though! It could also depend on the direction your windows face.
I read your article. You have explained very nicely how to Build a Pergola on a Patio with Wood Slat Privacy Screen. There are many benefits to understanding the subject to give many beautiful pictures in your article. Thank you so much for sharing the article so beautifully.
This post is so amazing! We are going to build a privacy wall like yours on our pergola. Thank you for all this helpful information! Did you have any regrets about going with such small boards and narrow gaps in between boards on the wall? Like did it feel too wooded? I think it photographed amazing and I’m just curious how it felt to you lounging inside.
Oh thanks so much! No regrets at all! We were going to use smaller planks (2″H vs 4″H) but went with 4″ because they were less likely to warp. It felt very private but still let light and some view through!
We’re building permits requires since you attached to the house?
No they were not! But we did have to submit the plans to our HOA.
Why did you choose to not use the outdoor accents hex head washers on the post bases? Are you not concerned that the products is no longer able to get the shear loads that it was tested for by not using the required washers?
Sorry I’m not sure what you’re referring to!
I see you mentioned you moved, but do you know how well the privacy walls have held up in the last two years? I’m curious if it still looks new or not, if the wood has warped at all etc.
They still look great! We didn’t seal the cedar because I wanted it to age and gray over time.
Did you use two 4”x10”s for the main front beam and connect them in the middle to get the length you wanted? Did you just connect them over one of your support beams?
Yes, the 4x10s were connected with screws where they meet at the middle support post. They were also notched into the posts so that helped support them as well. Hope that makes sense!
What was the spacing between the privacy boards?
Hi, we ended up using 1″ x 4″ boards for the privacy wall instead of 1″ x 6″, and left a 1″ gap in between each board.
Were you able to purchase the cedar locally from a lumber yard or did you order from an online cedar mill? I live in MT and my local lumber store is not able to get any cedar other than 1×6 sticks…
We purchased from a local lumbar yard. They did have to order in the larger beams though.
You mentioned: “The next step was to install the support boards and metal flashing to the house. The metal flashing is an important step to keep water from collecting on the wood, which could damage the siding on your house.”
Can you please elaborate on how you install the metal flashing?
Thank you!
How did you attach the crossbeams to the headers?