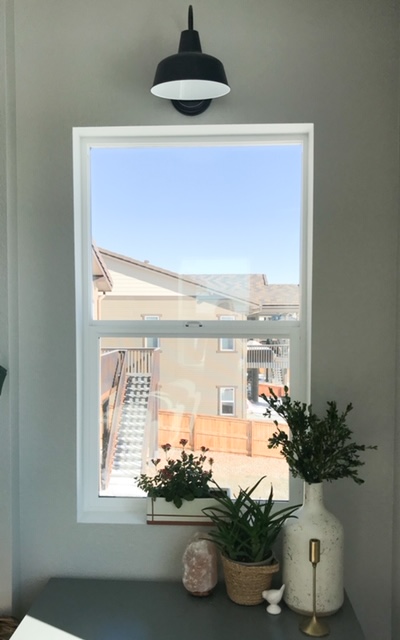
Our DIY Window Casings are by far my favorite DIY project we have done in our house! They completely changed the look and feel of our living room. Our windows looked so plain and unfinished without them. Now they look finished, framed and catch your eye whenever you come into my house! I have already inspired some friends to do the same to theirs, and I’m hoping to inspire you as well! Unfortunately, we did this project before starting this blog so I don’t have any good before pictures. However, I did take some progress pictures so that should give you an idea of what it looked like before (but they were taken with my old phone so the quality is not the best – sorry about that!).
This is a very simple DIY but does take some time. It is simple because the actual work is very easy and anyone can do it! Even DIY newbies! However, you will want to set 2 full days aside to complete this project. Below I am going to go into detail on the exact steps we took to complete this project, as well as the tools and the supplies needed! But I promise you, the time it takes to complete it will be worth it! I honestly think this is the project that added the most value to our home thus far!

Tools You Will Need
- Miter Saw
- Nail Gun (16 Gauge)
- Sander (Optional)
- Tape Measure
- Caulking Gun
- Paint Brushes
Supplies You Will Need
- Nail gun nails (2 inch, 16 gauge, finishing nails)
- Sand Paper for Sander (Optional)
- Caulk
- Paint (we used Alabaster White by Sherwin Williams)
- Spackle
- Wood: For each window you will need three 1×3’s, one 1×4 and two 1×2’s
Two important side notes about the wood. First, we bought nicer wood that has slightly rounded edges and was pre primed, but you do not have to do that. Our friends who did this after we did bought cheaper wood and it worked fine. However, they did need to sand their wood and use a primer before painting. We didn’t do either because the wood we bought was nicer. Totally up to you on what type of wood to buy – both are great options!
Second, you need to measure each window well to make sure you get the correct lengths. We are not including our measurements because more than likely our windows are not the same size as yours! Even our windows that were supposed to be the same size were different sizes (up to an inch off!) so make sure you measure every single one!

Step By Step Instructions For DIY Window Casings
1. The first thing you want to do is measure each of your windows. We actually did one window at a time (we had 6 total). We measured one and then would go out and make cuts. Even though 4 of the 6 windows appear to be the same size, they were not! So be sure to measure each one carefully.
2. You are going to want to frame out the bottom and sides of the window first with the 1×3’s. We had the bottom piece stick out on both sides so that the side pieces sat right on top (refer to the pictures below).

3. Then you nail in those three pieces as close to the edge as possible. Start by nailing the bottom piece in first, and then nail in the side pieces.
4. Once those are nailed in you will take one of your 1×2’s and turn it sideways (you want it to make a little ledge). We made our 1×2’s hang over about 1.5 inches on each side. You can either do that or make it flush with the side pieces – your choice. You are going to nail it from the top into the two side pieces that it’s sitting on.
5. Once that is nailed in you will take your 1×4 and nail it in right on top of the 1×2. Once that is nailed in you will want to put a couple nails into the bottom of the 1×2 so it attaches to the 1×4 above it.
6. Then, you attach your last piece, the other 1×2 right above the 1×4. Again you want to turn it to make a ledge. Then, nail it in from the top into the 1×4.
7. Yay! You are done with the wood working part! The rest is all simple! You are going to caulk around all the edges and seams and fill in all the nail holes with spackle. Then, after the spackle and caulking has dried you will want to sand down the spackle so it’s smooth with the wood. Then paint! That’s it!
I promise you that this is a very simple DIY project! It definitely takes some time because of the caulking and painting mostly. But how amazing is the finished product? It seriously changes the entire look and feel of the room!
This is my favorite DIY project we have done and I hope you liked it too! If you have any questions please leave them in the comments below or on our instagram! If you haven’t already, also make sure to read my post from last week about How To Customize Your Home In Three Simple Ways! I go over three super easy ways to make your house feel like a home!
See our Disclosure here.
[…] don’t forget to check out our blog posts from last week, including the tutorial on our DIY Window Casings! It is my favorite DIY project we have completed so far, so make sure to check that out. Have a […]