Sharing how we gave our old basement playroom a fun and colorful new look with peel and stick wallpaper and board and batten accent walls.
Our long basement playroom remodel project is finally reaching its end, and I’m thrilled to share the latest update! We’ve just completed the final big step: adding some peel and stick wallpaper and simple board and batten to the walls. This Fun Playroom Wallpaper Idea with kid’s Peel and Stick Wallpaper has really tied the room together. With this step checked off, our basement remodel is nearly finished! Below I’ll get into the details of how it all came together and show how these additions have transformed our space.
This post was sponsored by Tempaper. All thoughts and opinions are my own. View the disclosure for more information.
Shop the Playroom

Ceilings | Sensory Swing | Monkey Bars | Climbing Wall Holds | Black and White Wallpaper | Chalkboard Wallpaper | Buffalo Check Throw Pillows | Kid’s Art Frame | Wall Organizer | Dustless Chalk | Modular Play Couches | Cube Storage Ottomans | Bean Bag Cover | Balance Board | Cube Storage Cabinet | Area Rug | Provenza LVP Floors
Basement Playroom Before & After –
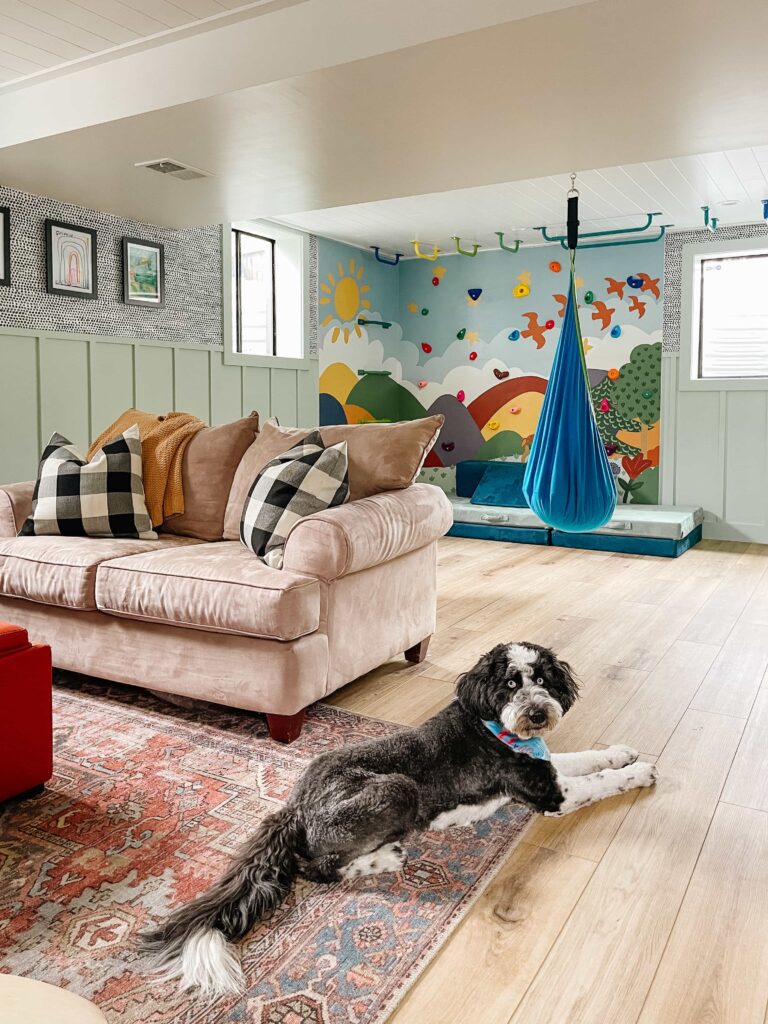
I still can’t believe this is the same room! It looks so much better and the new wallpaper and board and batten made a big difference in the overall look of the room! You can read more about how we updated our drop ceiling here.

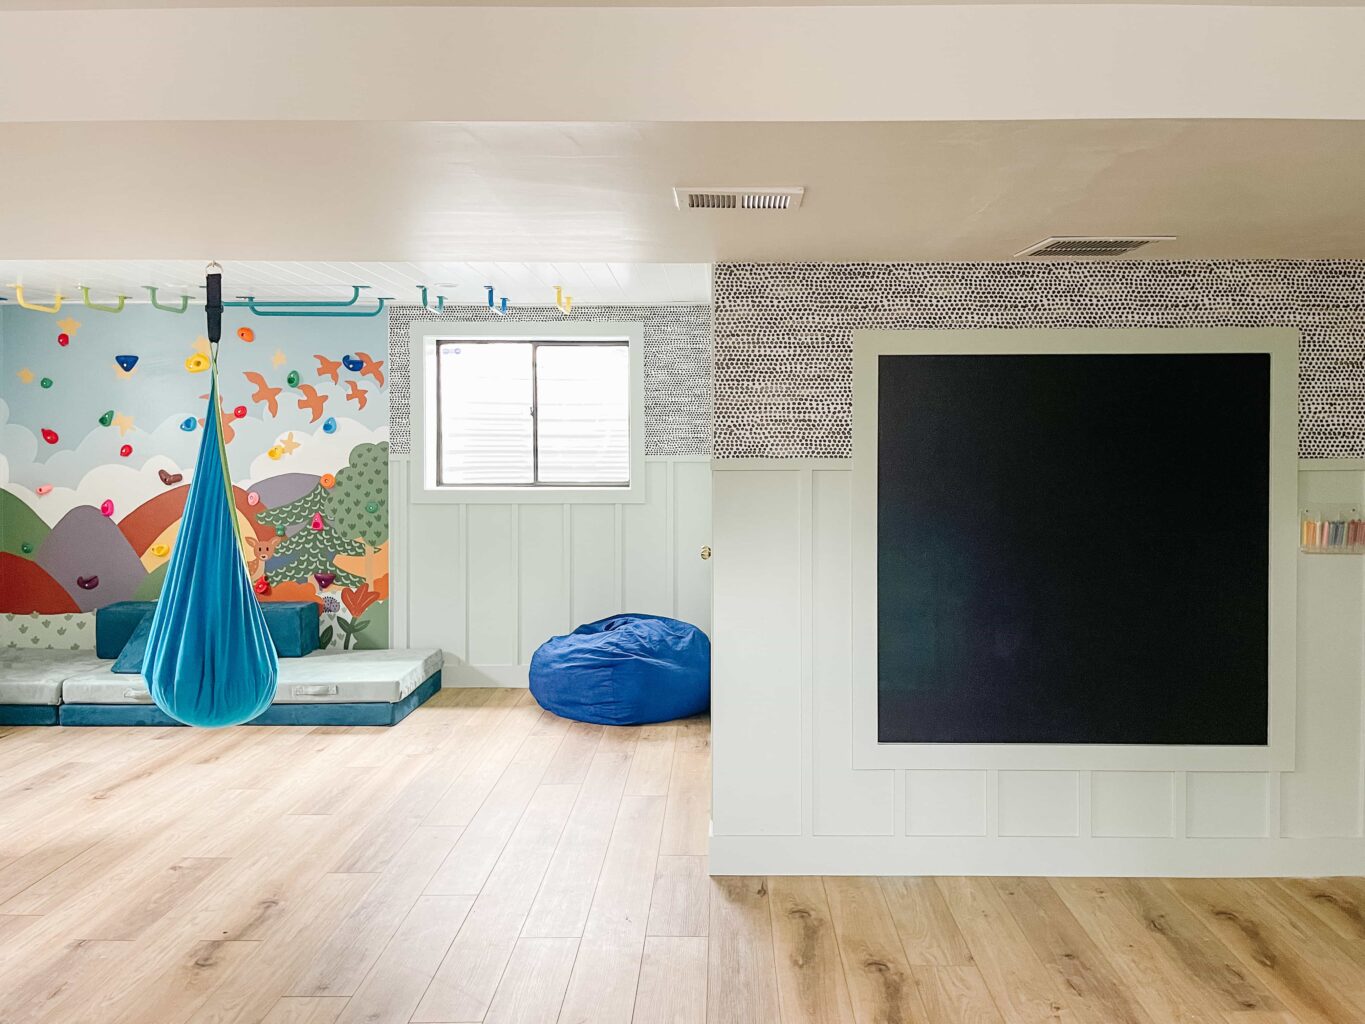
Simple Board and Batten
The first step was to add some simple board and batten to the lower half of the walls. We used the same skinny boards that we did in my son’s bedroom makeover. I love the combo of a wall paneling at the lower portion of the walls with wallpaper above that. This mixture really elevates the space, and makes it feel really custom. Adding wallpaper to the top portion only also helps it feel less overwhelming if you have wallpaper with a busy pattern.
The thinner boards keep this look clean and simple, and helps keep the cost down. The vertical elements of the board and batten also help make the room feel taller. Our ceilings are very low in our basement, a little under 8′, so we definitely needed help in the height department!
The board and batten paint is Benjamin Moore – Jack and the Beanstalk. It’s such a cute minty green color! We landed on this color because it is one of the ones I used in the Climbing Wall Mural. I think it helped tie the mural into the room by using one of those colors. I love that this color is bright and fun, but not super overpowering, and keeps this darker basement feeling lighter.
We also replaced all of the base, door and window trim. We used the same paint color, Benjamin Moore – Jack and the Beanstalk, for all of the trim and the doors.
Black and White Playroom Wallpaper Idea
At the top portion of the walls we hung this fun black and white peel and stick wallpaper from Tempaper & Co. I thought a black and white pattern would be a nice contrast to the colorful mural and toys.
We’ve hung peel and stick wallpaper multiple times throughout our house and I love how much of an impact it makes! It’s really easy to install once you get started and easy to remove if you end up wanting a change.
Here are a few more Black and White Wallpaper Options I considered that would look great in a Playroom or Kid’s Room:
- Shift Peel And Stick Wallpaper By Bobby Berk (more colors)
- Wiggle Room Peel And Stick Wallpaper By Bobby Berk (more colors)
- Block Print Leaves Peel and Stick Wallpaper (more colors)
- Checkmate Peel and Stick Wallpaper (more colors; thinking about using this at our basement stair risers!)
- Sketched Hearts Peel And Stick Wallpaper (love the red and white color too!)
- Mosaic Scallop Peel And Stick Wallpaper (more colors)
- Sunrise Scallop Peel And Stick Wallpaper (more colors)
- Markings Peel And Stick Wallpaper
- Moire Dots Peel And Stick Wallpaper (more colors; this is the one we used)
- Stripe Peel And Stick Wallpaper (also in a navy/light grey color-way that I love!)
Chalkboard Wall with Peel and Stick Wallpaper
One of my favorite parts of the Playroom is this cute Chalkboard Wall! We used chalkboard peel and stick wallpaper and framed it with the window trim. The chalkboard wallpaper has held up great, and it very easy to wipe clean. I love that the kids have a big place to draw now!
I made the mistake of giving the kids regular chalk to use at first, and that made a huge mess. I found this dust-less chalk, they are basically like crayons, and they work so well and don’t make a mess!
I hung this clear acrylic wall organizer up to hold the chalk.
How to Hang Peel and Stick Wallpaper
EQUIPMENT / TOOLS:
- Tape Measurer
- Scissors
- Level (I LOVE our Laser Level)
- Plastic Smoothing Tool (love this felt edge one)
- Utility Knife with Extra Blades
- Metal Ruler / Straight Edge
- Ladder / Step Stool
- Cloth / Sponge
MATERIALS:
- Peel and Stick Wallpaper
1. Surface Preparation
Ensure the wall is clean and smooth by wiping it down with a cloth to remove dust, grease, or other substances that could affect the wallpaper’s adhesive. Smooth out any minor imperfections by lightly sanding bumps on the surface.
Note: Peel and stick wallpaper can be applied to textured walls, though effectiveness may vary depending on the wall texture.
2. Establish a Guideline
Mark a straight and level line to align the first piece of wallpaper. Avoid relying on the ceiling or floor/trim for alignment, as they are often not perfectly level. Use a level, pencil marks, a chalk line, or a laser level to create an accurate guide.
I LOVE our laser level and have used it so many times since buying it (when hanging picture frames, hanging shelves, installing beadboard or board and batten…). The laser level is really easy to use and I moved it around the room to make sure each piece was straight.
3. Pre-Cut Wallpaper Pieces
Pre-cut wallpaper to the required height, especially for shorter areas like above board and batten. Measure the height with a tape measure, then use scissors to cut the wallpaper with the backing still intact.
Ensure to add a few extra inches to accommodate any variations in height and to account for pattern repeats for seamless alignment during installation.
4. Wallpaper Installation
Begin by peeling off a small section of the backing at the top of the wallpaper piece and align it with the guideline. Leave a slight overhang at the ceiling and base; this will be trimmed off at the end. Gradually peel off the rest of the backing while smoothing the wallpaper from the center outward to eliminate air bubbles.
Next, use a straight edge tool (it helps to have felt on the edge so you aren’t scratching the wallpaper) to smooth out the piece. Work from the middle and out to the sides to get all of the air bubbles out.
Tip: If you have any air bubbles that are really hard to get out you can use a needle to make a small pin prick in the wallpaper to release the trapped air.
Proceed to install subsequent pieces, slightly overlapping each one, and ensure proper pattern alignment.
5. Trim Edges
Once all wallpaper pieces are installed, trim the edges at the ceiling, baseboards, and around any obstacles such as doors, windows, or electrical outlets.
Use a straight edge tool, such as a metal ruler, and a sharp utility knife to make clean cuts. Regularly replace the blade to maintain sharpness for precise trimming.
Leave a Reply