See how we added colorful beadboard wainscoting at our small mudroom area near our garage entrance to spruce it up!
This past weekend we got started on our Small Mudroom area makeover by adding some colorful beadboard wainscoting! This area leads to the garage and is how we enter into the house most of the time. I wanted to make this small mudroom space more practical for our family, but also wanted to make it fun and colorful!
This space is kind of tucked away and doesn’t get a ton of natural light, so I felt that adding some color back here could help brighten it up. I also liked the idea of adding a different wall treatment to this space to designate it as a separate area – trying to make it feel more like an actual “mudroom”.
This post contains affiliate links; see the Disclosure here.
Read on below to see how we transformed this small mudroom area off of our garage with colorful beadboard wainscoting!
Updating this Area into a Functional Mudroom Space
Because this area near our Garage entrance isn’t technically a mudroom, I wanted to find a way to designate the space to help it feel separate from the Family Room right behind it.
This small mudroom area consists of a large coat/storage closet, a small powder room, my office, and a hallway space that ties it all together.
When we first moved into this 1970’s fixer upper home, this area felt very cramped and dark. Check out this BEFORE PHOTO below to see what I mean…
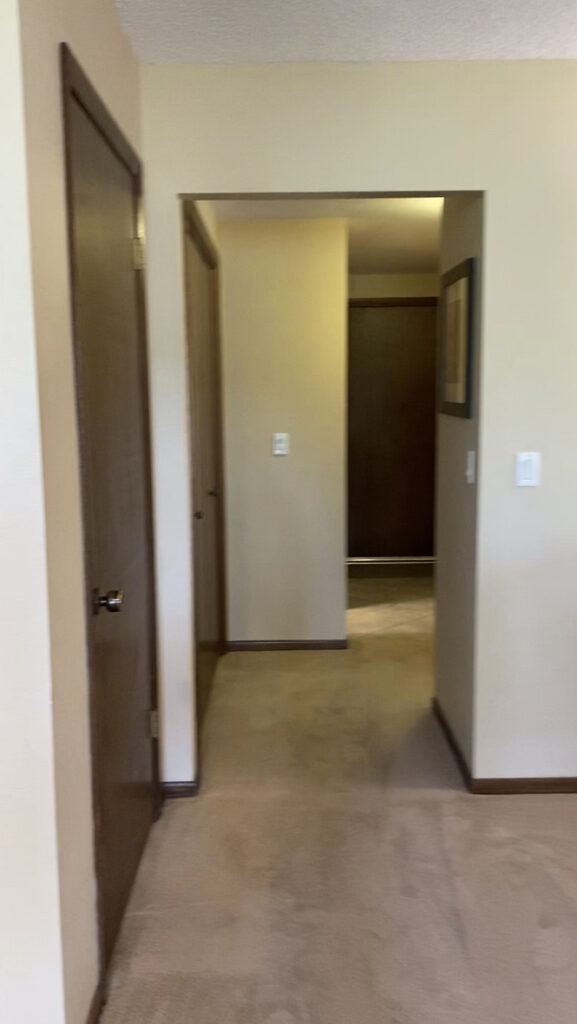
During the first phase of our remodel right after we moved in, we actually changed a few things in this area to help it feel more functional and open.
We removed the small coat closet that was on the right side near the office/guest bedroom. There is a very large closet (what we think was once a Laundry Closet) on the other side of the hall, and it is more than big enough to hold coats, shoes, cleaning supplies, and other items. We didn’t feel like we needed both closets here, and preferred to open up the space instead.
We also widened the opening into this space from the Family by about 2′. This helped so much! More natural light is able to get back here now, and it doesn’t feel like such a bottleneck.
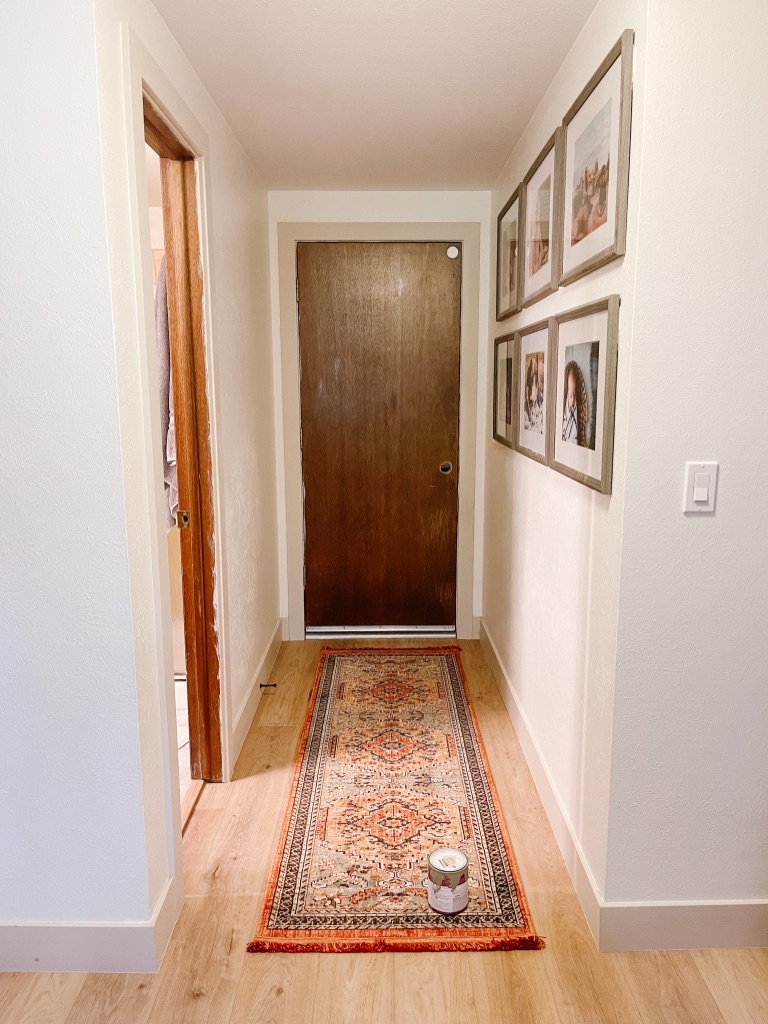
We extended the same vinyl plank flooring here that we have throughout the rest of the main areas. Check out this Provenza LVP Flooring Review for more information on our floors!
A few months ago I also painted the old flat panel doors. We are planning to add a moulding detail to these doors as well, like we did for this flat panel door makeover.
Why I Chose Beadboard Over Other Wainscoting Options
This was actually a tough decision because there are so many cute accent wall and wainscoting ideas that I love! I searched through Pinterest and Instagram looking for inspiration, and actually had to cut myself off because there are just too many ideas!
I ended up drawing a few renderings with the different options to help me visualize it to decide –

I kept coming back to the beadboard paneling. I like how it feels classic and sophisticated but still casual. Perfect for an updated mudroom space. I also have never used beadboard before and I love trying new things!
Another style I was considered was a classic wainscoting with moulding boxes, similar to what we have on our interior doors. I love that look, but there were a couple of reasons why I didn’t feel like it was quite right – One, I was worried the moulding at the walls would feel too busy and compete with the moulding at the doors. And two, we have textured walls, so in order for it to look right we would have had to smooth out the walls. This can definitely be done – by either skim coating it or using thin MDF sheets – but that would have added another day or two to this project.
You definitely can add the moulding box detail to textured walls for a faux wainscoting look as well, but I felt like it would look weird to have the same detail on the smooth doors, right next to the textured walls.
I considered board and batten, but still liked the beadboard idea better. We also could have done vertical shiplap, but we already have that at the built-in banquette, and the upstairs bathroom so I wanted something different.
Sometimes you just have to go with your gut! And I was really leaning towards the beadboard paneling, so thats what we went with!
Beadboard Wainscoting Color Options
I went back and forth between a few color options too – Behr Muted Sage (the same color that was already at the door to the garage), Sherwin Williams Accessible Beige (what our trim and doors currently are), or a dark charcoal color.
To help decide which color to go with, I drew a few more renderings to visualize it –
In the end I chose Behr Muted Sage, because I wanted to add some color and have fun in this space. I love this sage green color because it is more of a muted neutral color that I won’t get tired of quickly. I also used it on the cabinet doors in our small primary bathroom update and love it in there.
I also went back and forth on whether or not to paint the existing base, trim and doors green as well, or leave them accessible beige. I ended up painting it all green and am so happy I did!
How to Install Beadboard Wainscoting
Materials & Tools Needed:
- Beadboard
- Chair Rail
- Nail Gun with 16 Gauge Nails
- Table Saw
- Miter Saw
- Spackling
- Clear Paintable Caulk
- Painters Tape
- Paint
- Paint Brush
- Foam Paint Roller
Step 1 – Measure
Measure your walls to determine how many panels of beadboard and pieces of chair rail you will need. You will also want to determine what height you want your chair rail at. You can typically find either 32″H beadboard wainscoting panels, or 48″ x 96″ beadboard sheets.
We went with the 32″H wainscoting panels. Including our 6″H base, and the chair rail, the overall height is 39-1/2″.
Step 2 – Cut and Install Beadboard
Use a table saw to cut your beadboard panels to the appropriate lengths.
Next use a 16 gauge nail gun to attach to the beadboard panel to the wall.
If you are wanting it very secure, you can also use liquid nails to glue the panel to the wall. This is more of a permanent solution, meaning the drywall will need to be replaced if you decide to ever remove the wainscoting. We used nails only, in case we ever want to remove it.
Step 3 – Cut and Install Chair Rail
Use a miter saw to cut 45 degree angles for the corners of the chair rail.
Note: We accidentally bought this chair rail and base combo pack. I actually liked the look of the base better so we used that for the chair rail.
Step 4 – Fill Holes and Cracks
Sand down any rough spots or nail holes.
Use spackling and a putty knife, or your fingers, to fill any nail holes and cracks. Once dry, sand until smooth with the beadboard panel.
Step 5 – Caulk Seams and Tape Lines
Use clear paintable caulk to fill any seams before painting. We also caulk all of the tape lines to create a smooth paint line once the tape is removed.
Step 6 – Paint
The paint color we used is Behr Sage Green. We used a paint + primer, but I still did two coats everywhere.
I found the best way to make sure everything stayed smooth, was to use a brush to paint the base, chair rail, any cracks, and down the beadboard lines first. Then I used a small roller to paint the rest and smooth it all out.
I didn’t worry about taping anything off while painting the green, because I was painting the new wainscoting, as well as the existing base, trim and doors.
After the green coats were done, I came back and tape off the wainscoting from the wall and touched up the wall color.
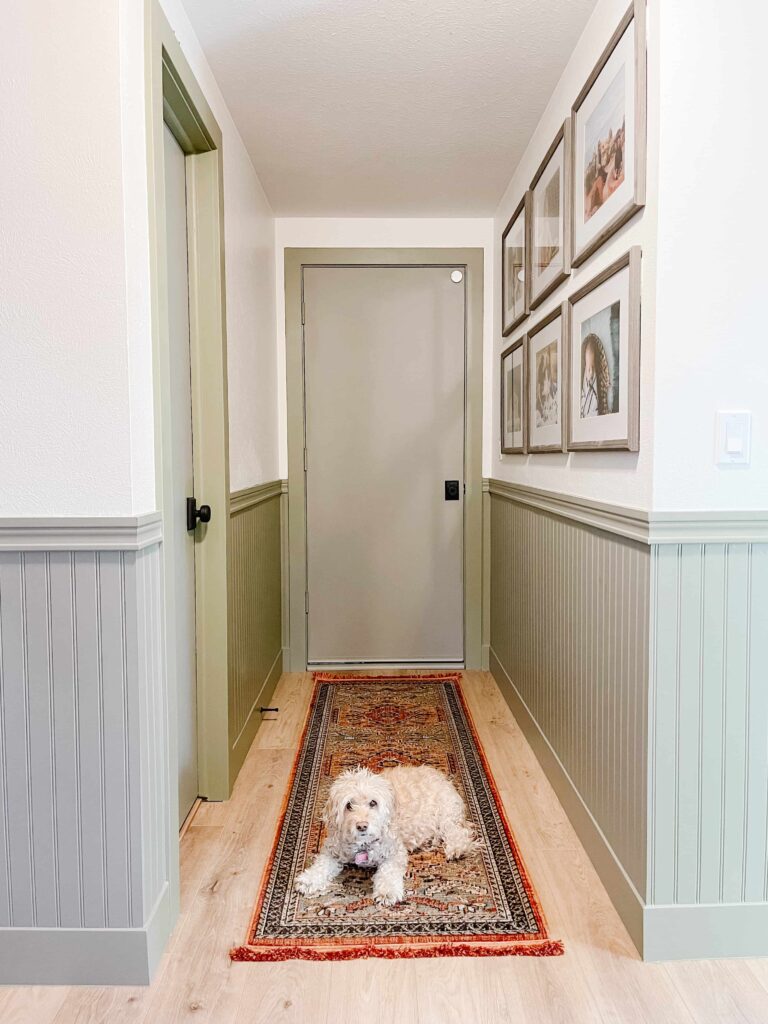
Final Look – DIY Colorful Beadboard Wainscoting at Small Mudroom
I am SO happy with how this simple and colorful DIY beadboard wainscoting project turned out! I used a table saw and a miter saw for the first time for this project, and it was much easier than I thought! This was a very simple DIY project that I think anyone can do!
Adding the colorful beadboard wainscoting to this small mudroom area really made such a big difference. I actually feel like the hallway feels bigger now, because it draws your eye to the back of the space. It doesn’t feel dark at all either because we still have the white walls above the wainscoting.
What do you think?! Would you have chosen the beadboard option? What about the color? Let me know in the comments below!
I’m so happy you went with the beadboard and painted the doors and trim the same color. Love the green! It looks so good!
Thanks so much, Claudia! I’m so happy I went with all green as well!
Love the look! And also the choice to go sage. You’re giving me courage to buck the black and white trend and use colors I love.
Thank you so much! I couldn’t handle the all white walls either!
Absolutely love how it turned out!!
Thank you!! Me too!
Where did you purchase the bead board panels?
We got the beadboard at Home Depot
Looks great! How did you do the renderings?
Thank you! I used Procreate on my ipad
Hello,
What type of finishing/sheen did you use for your paint on the beadboard (i.e. eggshell, satin, etc.)? Thanks!
Regards,
Steve
We used eggshell
What color do you have on the walls?
Walls are SW Alabaster, Beadboard is Behr Muted Sage
Hello,
How did you hide the seam from ripping the 4×8′ sheet to get your height you needed?