This post shares all the details of our basement playroom makeover including the drop ceiling update, new LVP flooring, fun playroom wallpaper, and the kid’s indoor climbing wall.
We just finished up our big basement playroom makeover and I’m soooo happy with how it all turned out!! Our old drab 1970’s basement was in desperate need of a refresh! I’m very thankful that it was a finished space when we moved in so the kids have had a place to play, but I have been itching to turn it into a cute playroom for them and am so excited we were able to make that happen!
Below I’m sharing all the details of what we updated, including a cost breakdown! We tried to make this a budget-friendly basement remodel while still selecting materials that are durable and will last! We have 3 boys that can be rough so I wanted to make sure this playroom can withstand them and make everything as washable as possible, haha.
This post contains affiliate links, which provide me with a small commission if a purchase is made, at no addition cost to you. View the disclosure for more information. Thank you for your support!
Shop the Playroom
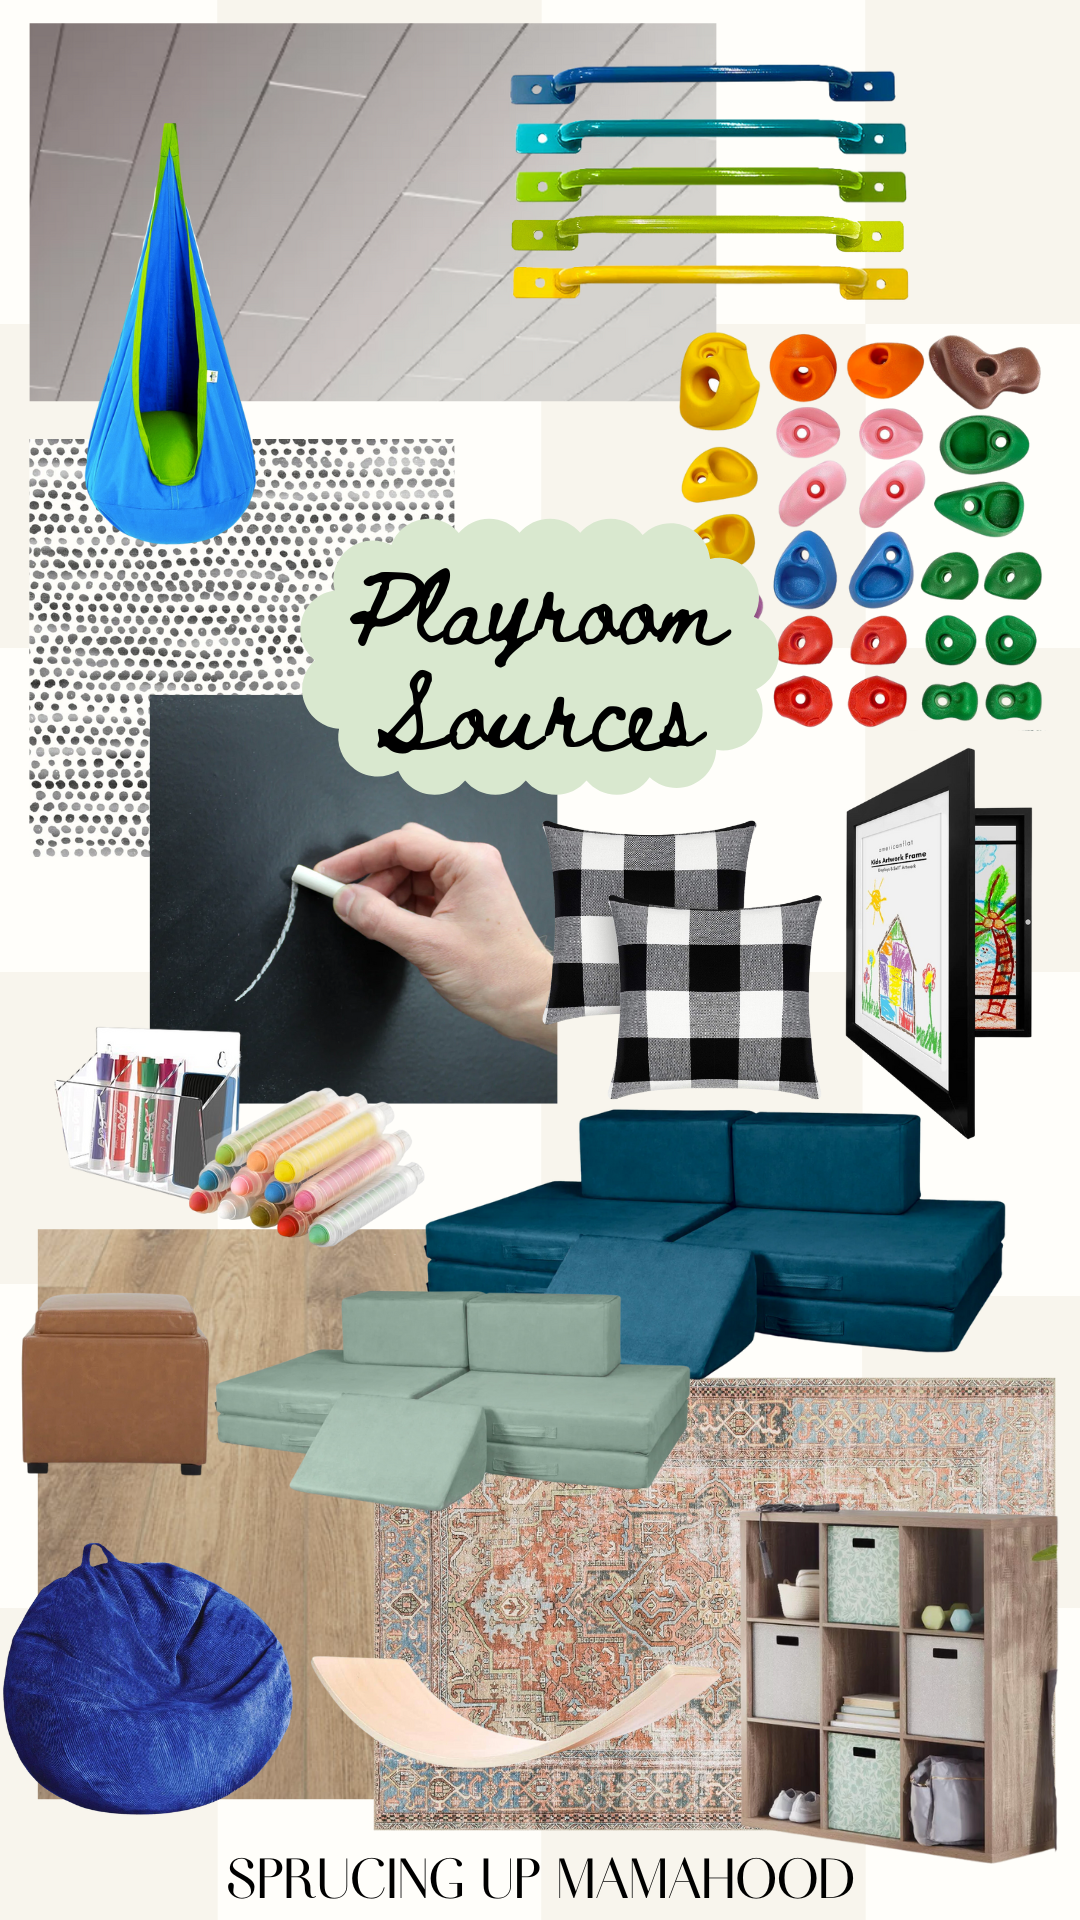
Ceilings | Sensory Swing | Monkey Bars | Climbing Wall Holds | Black and White Wallpaper | Chalkboard Wallpaper | Buffalo Check Throw Pillows | Kid’s Art Frame | Wall Organizer | Dustless Chalk | Modular Play Couches | Cube Storage Ottomans | Bean Bag Cover | Balance Board | Cube Storage Cabinet | Area Rug | Provenza LVP Floors
Check out these Playroom Remodel Updates if you missed them and want more details:
- Top Basement Playroom Remodel Ideas & Inspiration
- Easy Way to Update a Drop Ceiling
- Fun Playroom Wallpaper Idea
- DIY Kids Climbing Wall with Mural
Basement Playroom Remodel Before

When we first moved into our 1970’s home almost 4 years ago, the basement space was “finished” but it looked like it had been done years and years ago and I’ve been desperately wanting to update it!
The whole room is about 600 square feet so it’s a great size for a playroom.
This basement area also had wall to wall carpet that was no longer in the best shape thanks to our dogs and kids. Carpet is not my favorite in general, I hate how it is so hard to keep clean and traps dust, so I’ve been looking forward to replacing it with something else.
The old drop ceiling was also another eye sore in this space! The ceiling tiles were old, dirty, and stained, making this space look even darker and dingier than it was. For a basement, we actually get a pretty good amount of natural light but the fluorescent lighting wasn’t doing this room any favors.
Basement Drop Ceiling Update
The first project we tackled in our basement remodel was the drop ceiling! The drop ceiling was actually pretty convenient to have during our Kitchen remodel because it allowed us easy access to the plumbing and electrical above, but it was not in good shape and really needed an update! The ceiling tiles were dirty and stained, and the fluorescent lighting wasn’t working in some areas and was not the best looking form of ambient lighting.
I knew I wanted to update the drop ceiling somehow, but wasn’t loving the idea of drywalling the ceiling, knowing that would be a big expense, time consuming, and very dirty.
While I was looking online for ideas on how to easily update our drop ceiling, I came across Armstrong Ceilings. They came up with a genius product, the EASY UP clips, that allows you to install beautiful tongue & groove planks to the existing drop ceiling grid.
I was SO EXCITED to find this product! I love the look of wood plank ceilings (we have shiplap ceilings in our Family Room that I LOVE!), and this installation method meant that we didn’t need to remove the existing grid or add any additional framing!
The new ceiling planks were very easy and quick to install, I’d say it took my husband about 2 days to finish the ceiling, and that includes installing new recessed can lighting as well.
The clean white wood plank ceiling made such a huge difference in the look and feel of our basement playroom! I feel like it really brightened up the whole space and helped it look cleaner.
I absolutely recommend trying Armstrong’s ceiling products of you have a ceiling to update. They offer the ceiling planks in various different colors and textures. Their products can also be installed over old textured ceilings, like popcorn ceilings, as well, making any ceiling update easy and quick!
See Detailed Tutorial HERE on How to Easily Update a Drop Ceiling
Playroom LVP Flooring
When we first moved into our 1970’s home, one of the first projects we did was we removed the old existing carpet and tile throughout the main level and stairs, and replaced it with LVP flooring.
We’ve had our Provenza LVP flooring installed for almost 4 years now and love it! It is durable and easy to clean, even with our kids and dogs.
I went through a lot of floor samples before deciding on the perfect color – At Ease. I love how the floors have a mix of warm and cool tones, so they really work with so many different paint colors and color schemes. I also love the variation and texture of the planks; they look very realistic.
Because we have loved our Provenza floors on our main level so much, I knew I wanted to replace our basement carpet with the same LVP flooring.
Provenza’s LVP flooring is also a floating floor installation, making it really easy to install directly over our existing concrete slab in the basement.
We used the same LVP flooring at the stairs, using the flush stain nose at the edges of the stairs.
Here are all the details! You can visit Provenza’s website to find a retailer near you. I definitely recommend ordering samples because they offer sooooo many colors and many look very similar online but different in person.
Product: Provenza MaxCore 100% Waterproof LVP
Collection: Moda Living
Color: At Ease – I LOVE this color and how it works with all of the finishes in our home! I’d say overall the floors look like a warm toned white oak, but they also have gray tones throughout the planks, helping them work well with both warm and cool tones in your home. We also considered Road Trip (less variation), First Crush (more gray tones), and Sweet Talker (a little darker and warmer).
Size: The planks come in varying lengths up to 72” long and are 7.15” wide.
Thickness: 8mm thick, including a 20 mil wear layer and the attached underlayment pad.
Style: Ribbed, Realistic Wood Texture with a bevel in-between each plank
Stairs: We used the same material at our stairs and used the Flush Stair Nose piece for the edges of the stairs.
Price: When we bought our flooring for the main level almost 4 years ago, they were around $4/SF, now they are a little over $5/SF.
Provenza’s LVP Flooring is Greenguard Certified!
+ 100% Waterproof! These floors have been so easy to clean and take care of. We’ve had no issues with spills or water damage.
+ Durable – We have 3 boys and 1 big dog (used to have 2 small dogs too) and these floors have held up great over the past 4 years! And trust me they’ve taken a lot of hits! There are a few minimal scratches but they aren’t noticeable due to the variation and texture of the floors.
+Easy to Install – These are floating LVP floors making them super easy to install on top of your subfloor or concrete slab. Just make sure the floors are smooth and free of nails, staples, or chunks of glue or grout. Dylan installed these on his own in our basement in less than a day!
Find more Provenza LVP Flooring Details and my Full Review HERE
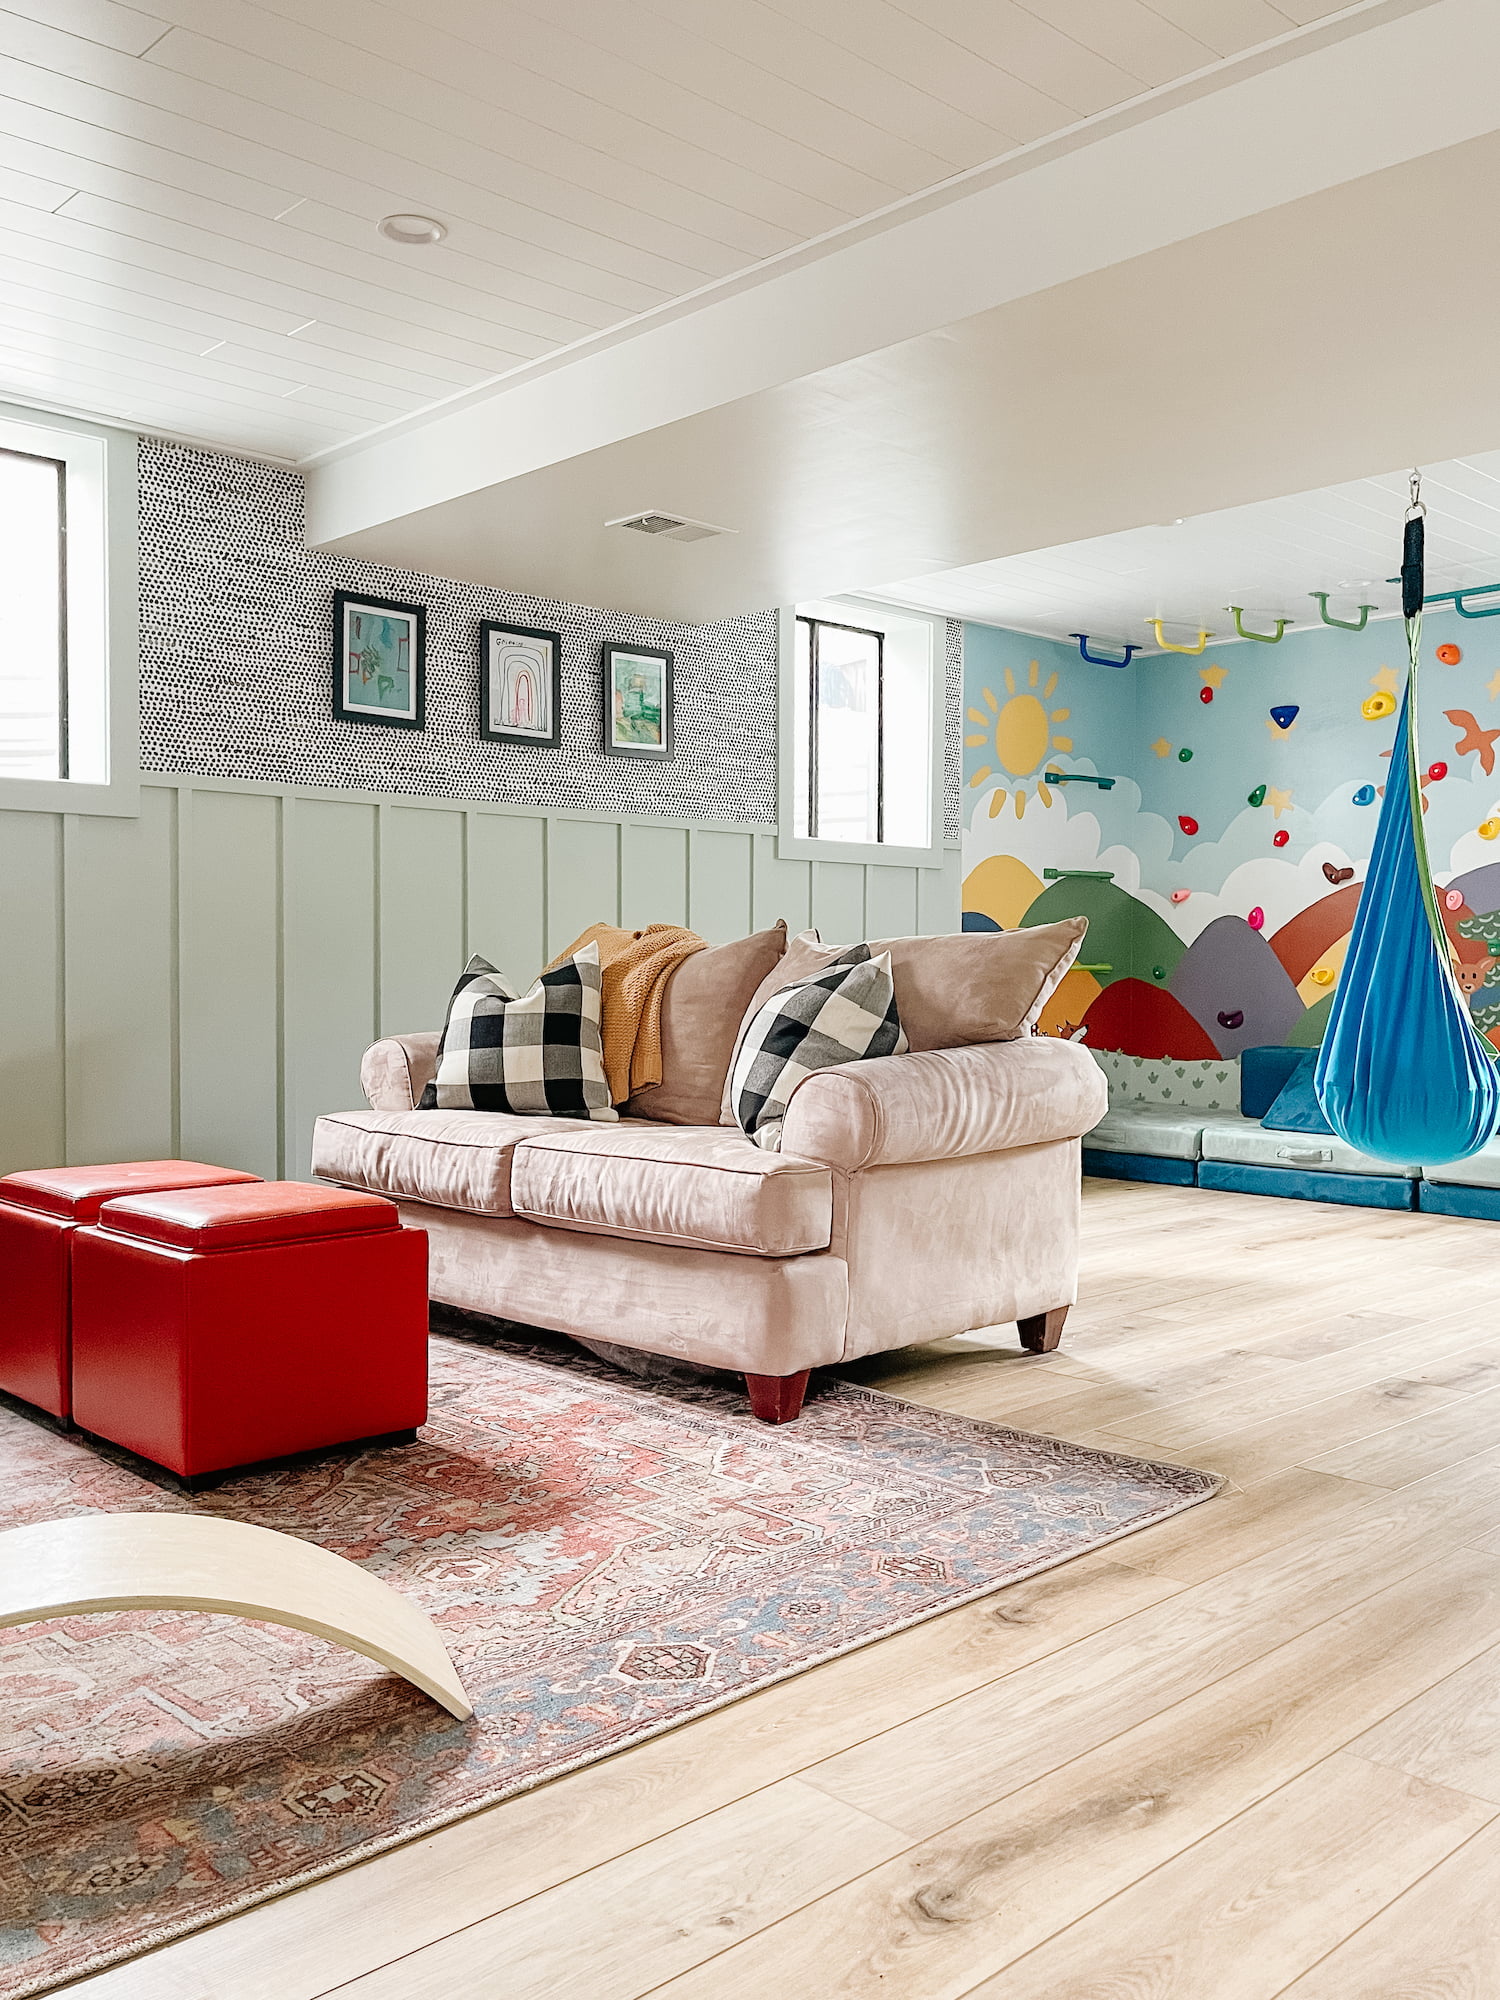
Playroom Wallpaper & Board and Batten
Once the ceilings and floors were complete, we were able to focus on the walls! My goal for this playroom makeover was to create a fun, playful, and colorful space for the kids, and what better way to accomplish that than by adding colorful paint and fun wallpaper?!
I love wallpaper and it’s ability to quickly transform any space! We’ve added wallpaper to many different rooms in our house and I love the pattern and color it adds.
Peel and stick wallpaper is especially easy to install.
For our basement playroom makeover, we decided to install a simple DIY board and batten (similar to what we did for my son’s bedroom) at the lower portion of the wall, and wallpaper above that.
The paint color at the board and batten is a cute mint green that I also used in the Climbing Wall Mural – Benjamin Moore Jack and the Beanstalk.
The fun black and white peel and stick wallpaper is Moire Dots from Tempaper.
We also replaced all of the baseboards and trim throughout the room with a wider, more modern option, which I feel really helps update the space.
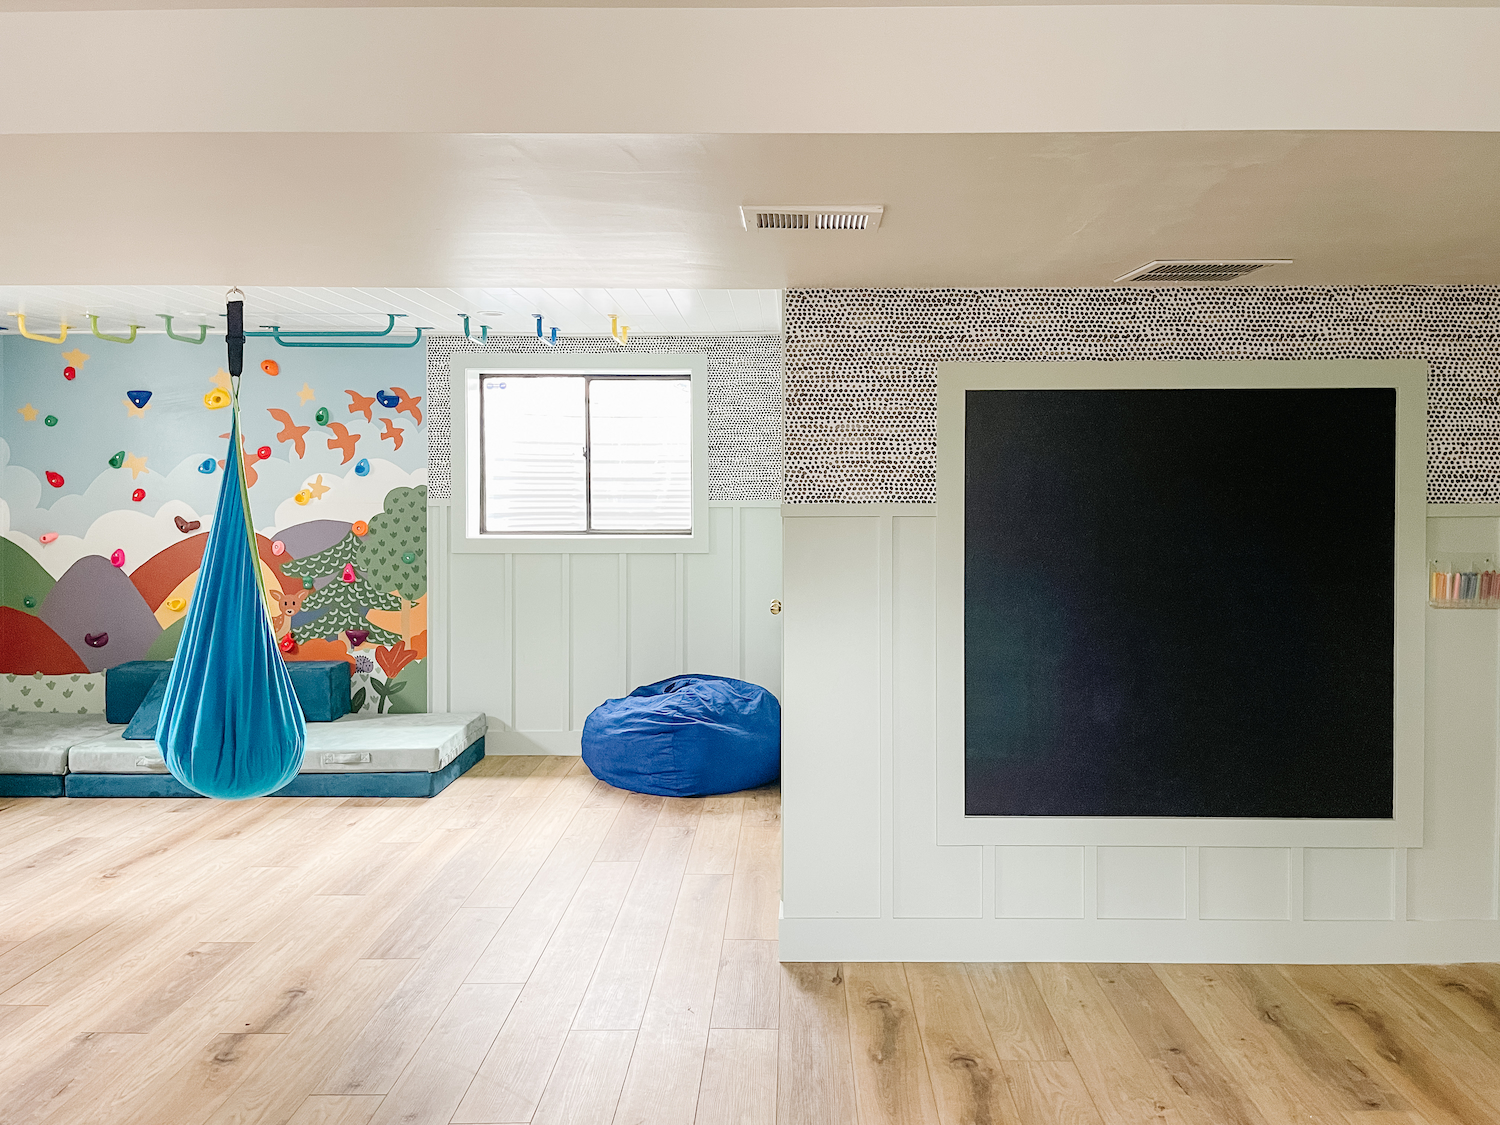
We also added this fun Chalkboard wall with peel and stick wallpaper! We framed it with the same 4″ trim as the windows and doors.
Find more details about the board and batten and playroom wallpaper HERE
Indoor Climbing Wall
My favorite part of our playroom makeover – the kid’s indoor climbing wall!! This space was so much fun to dream up, design, and build!
Before we embarked on this playroom makeover, I thought for a while on how we could best use this space. We have three boys, currently ages 7, 5, and 1, and they are very active (the older two at least for now)! They were already constantly building towers to climb and jump off of in the basement, so I wanted to figure out a way to create a safe space for them to still be able to do that.
Ultimately I divided the space up into 3 “sections” – a TV area, an arts and crafts area, and an area for active play and sensory needs.
For this active space, my goal was into include a climbing area, a swing area, cushions for building and landing on and open space to build forts.
The climbing wall space has been such a fun addition to the playroom and our kids love it!
I think the monkey bars on the wall and ceiling really make this space unique! not only can the boys climbing on the wall, but they can swing and climb on the monkey bars too, building strength and endurance (I’m always shocked by how strong they are already!).
We also added a fun sensory swing to this space that the kids love to swing and spin around in.
Note: we added reinforcements to the ceiling prior to installing the tongue and groove planks, that we screwed the monkey bars and swing into. See Climbing Wall Blog Post and Drop Ceiling Blog Post for more details.
Find more Details on the Indoor Climbing Wall HERE
Playroom Mural
I really wanted to make the climbing wall space unique and fun, and loved the idea of adding a playroom mural here at the climbing wall!
I designed the mural on my iPad first, and then we used a projector to trace it onto the wall, which really made the painting process sooo much easier than trying to free-hand it on the wall.
Once the mural was traced on the wall I painted it – it took me over a month but I love how it turned out!
Find Details about the Playroom Mural HERE
Shop Playroom Sources:
Basement Playroom Remodel Cost Breakdown
Overall we tried to make this a pretty budget friendly basement remodel and really focused on updating what was outdated, like the ceilings and floors, with durable materials that would hold up to the wear and tear that will occur in this playroom.
Here is a total cost breakdown for our Basement Playroom Remodel:
- Drop Ceiling Update:
- Armstrong Woodhaven Planks: $2,000 for 16 boxes (covers 464 SF)
- Easy Up Clips: $75 for 2 bags of Clips
- Moulding Trim: About $200
- 4″ Recessed LED Lighting: $260 for 10 cans
- LVP Flooring:
- LVP Planks: $2,910 for 18 cartons
- Stair Nose and Additional Trim Pieces: $310
- New Trim at Baseboards, Windows and Doors: About $500
- Board and Batten Accent Walls:
- Moulding: $300
- Paint: $125 for 2 Gallons
- Moire Dots Peel and Stick Wallpaper: $450 for 10 rolls
- Chalkboard Wallpaper: $45 for 1 roll
- Climbing Wall & Mural:
- 3/4″ Plywood sheets: $160 for 3 4′ x 8′ Sheets
- Climbing Holds: $50
- Monkey Bars: $340 for 10 Monkey Bars
- Long Ninja Bars: $130 for 2 Long Bars
- Paint: $50 for 14 3 oz. Samples
Total Playroom Remodel Cost: $7,905
Future Basement Playroom Updates
Overall I’m so so happy with how our basement playroom remodel turned out! The whole space feels so much brighter and cleaner, and it is much more enjoyable to hang out downstairs with the kids now.
I’m happy that we were not only able to update the space aesthetically, but we also made it more functional and fun for the kid’s by adding the climbing wall space and the chalkboard wall.
I would still love to remove the existing cabinetry in the corner and add a built-in reading nook there. I think a building a cozy secret hide out there would be so much fun.
We are mainly using furniture that we already have in this room now, but I’d love to eventually get a new large sofa so we can all watch movies down there as a family, and a big table to use for art, crafts, puzzles, homework, etc.
Otherwise this space feels pretty complete for now! Until I figure out a new project a want to take on, haha.
Thank you for reading all our our Basement Playroom Update! I hope this gave you some inspiration for creating a fun playroom space of your own!
Let me know if you have any questions in the comments below!
Hi! Beautiful transformation! Just wondering how high is your basement ceiling? Ours is only 6’7″ so I’m wondering which of your ideas we would be able to incorporate with such a low ceiling….
Thank you! Our ceilings are a little under 8’H