See how to update your Ikea Ivar Cabinets with this simple and affordable Ikea Hack!
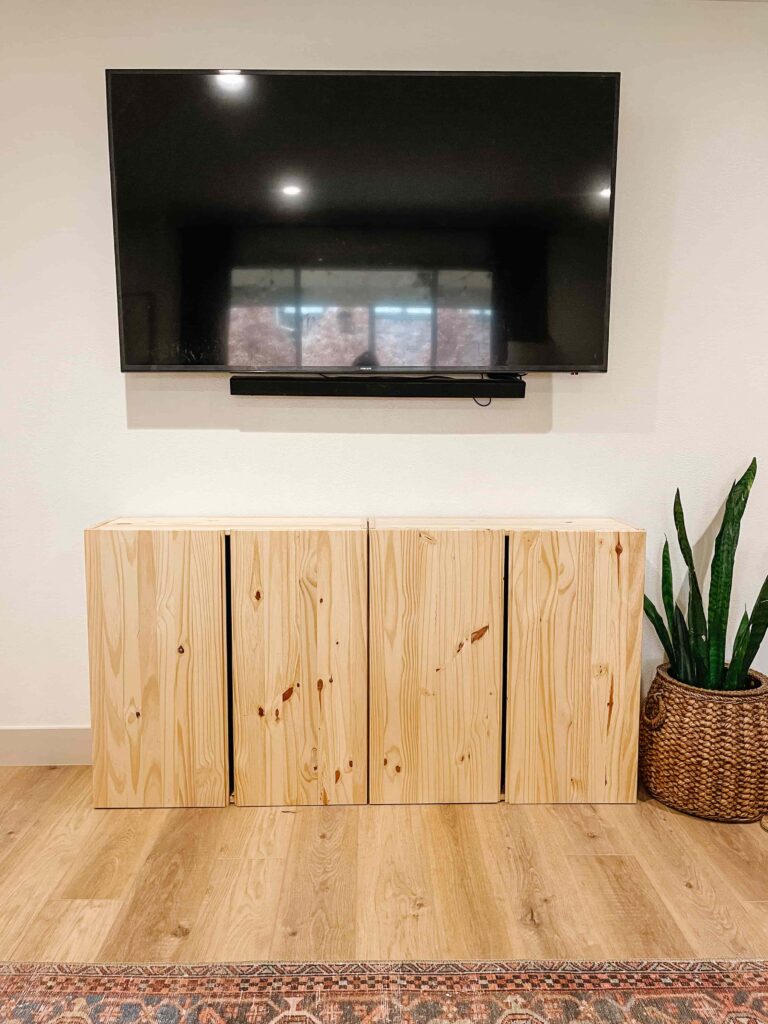
This DIY Ikea Ivar Hack has been a long time in the making! We bought these cabinets over a year ago and just finally made the time to update them! These Ikea Ivar cabinets actually do look great unfinished, as they come, which is probably why we let them sit there for so long, but I’m so happy with how this update turned out!
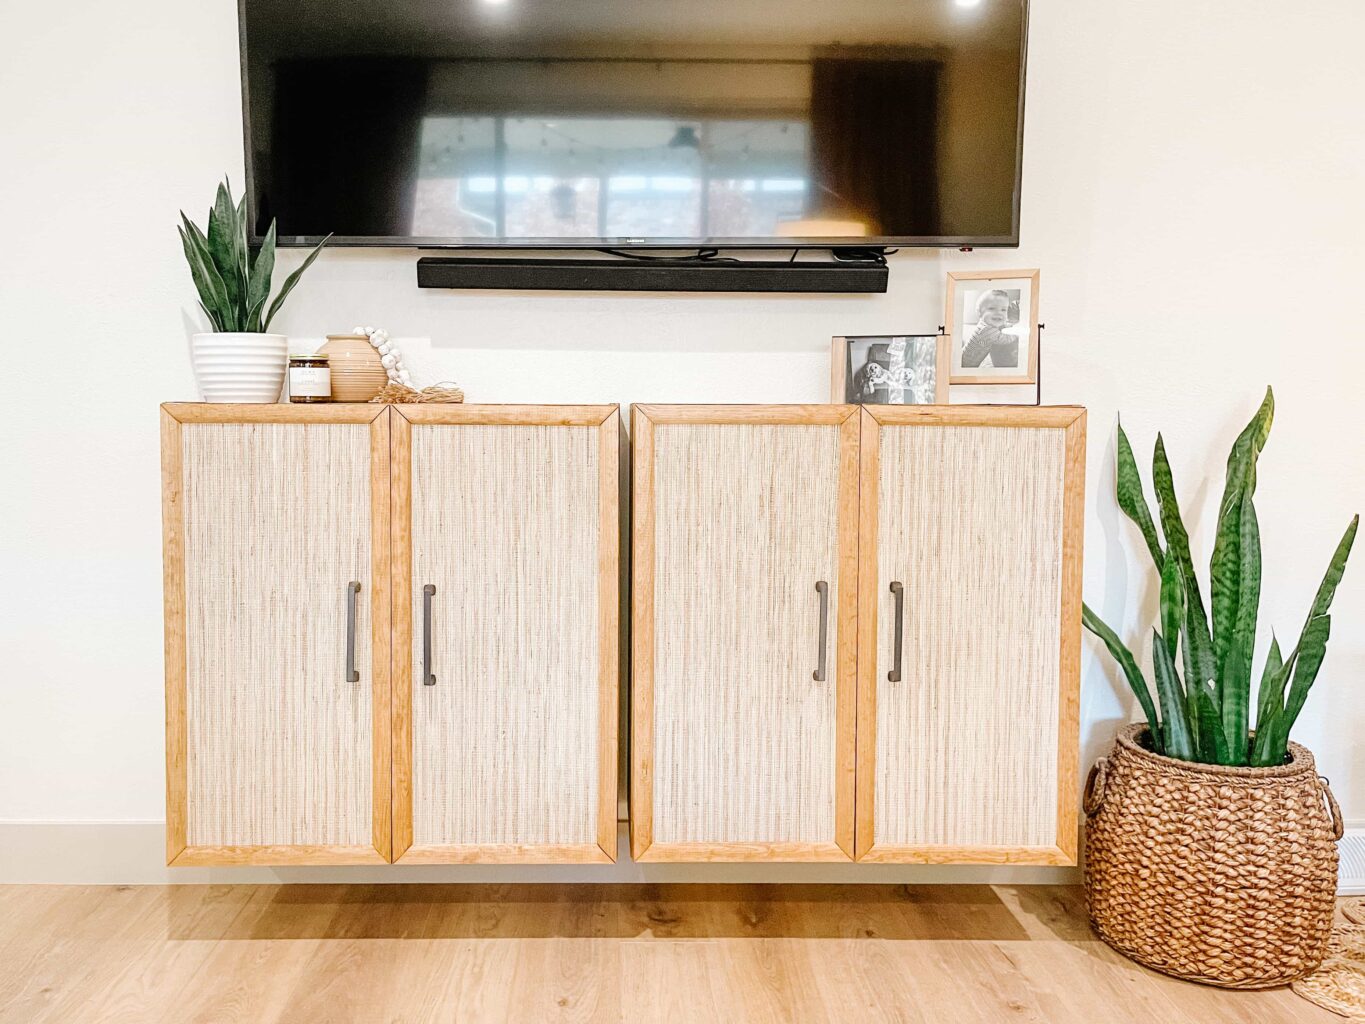
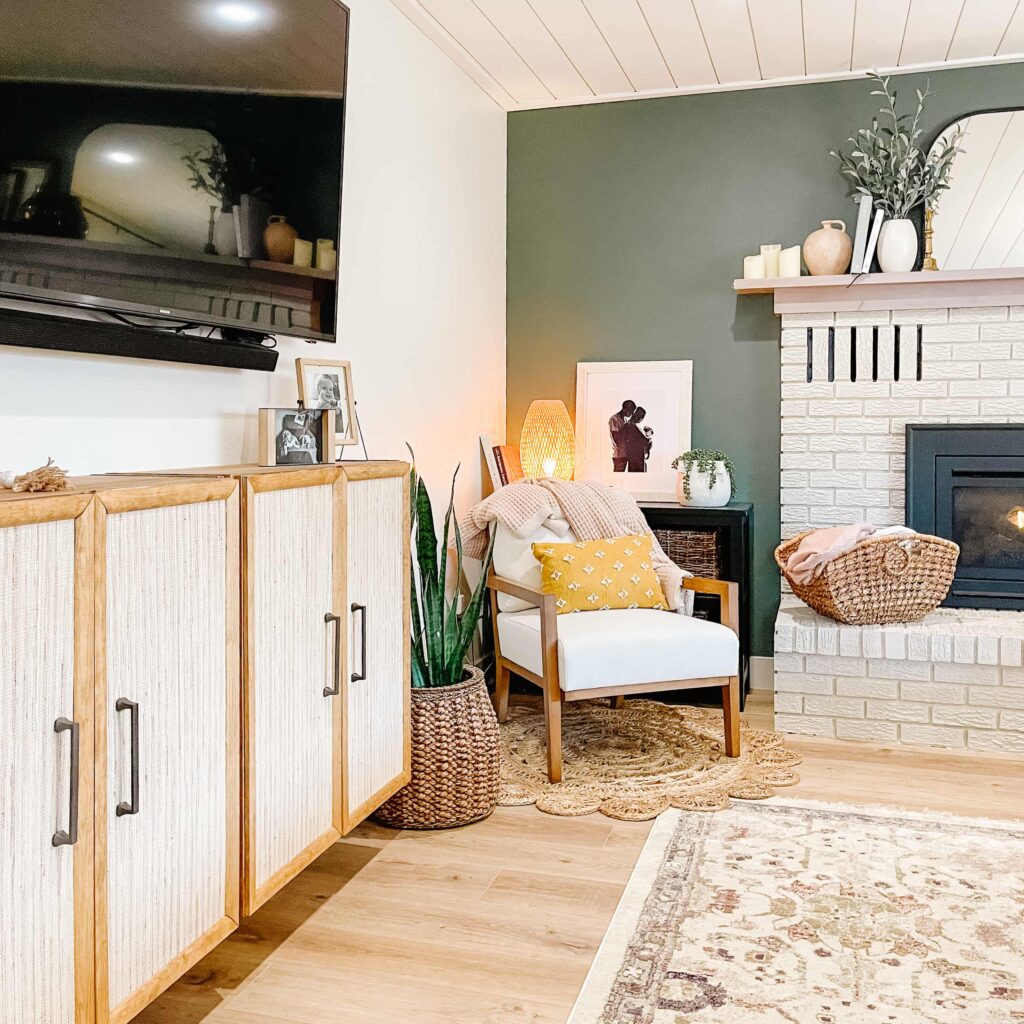
My plan was always to use these cabinets to make a TV Console for our Family Room, but I’ve seen them used in so many other ways, from Entryways, to Office spaces, to Closets; they are so versatile! For our Family Room, I wanted something simple under our TV, that didn’t take up too much space. This room is pretty long and narrow, so I didn’t want anything too deep that would stick out too far into the room.
I love that the Ikea Ivar cabinet comes in two depths – 12″ and 20″. We went with the 12″D cabinet, and used two side by side, so overall it is about 60″ wide. I like that the 12″ deep cabinet takes up less space, but in hindsight I kind of wish we did get the 20″ cabinet! The main reason being – it would have been nice to store all of our board games in these cabinets! I love to have game nights with friends and family and this would have been the perfect place to store the board games! The 12″ deep cabinets are a little too narrow for some of the games. But, we are able to keep toys, card games, and books in these cabinets.
Read on below to see how we transformed these Ikea Ivar Cabinets into a custom TV Console with natural Boho vibes!
This post contains affiliate links; see our Disclosure here.
DIY Ikea Ivar TV Console Hack Tutorial
BEFORE & AFTER OF IKEA IVAR CABINETS:

MATERIALS:
- 2 IKEA Ivar Cabinets
- Varathane Golden Oak Stain
- Wood Moulding
- Grasscloth Material
- Door Pulls
- Staple Gun
- Wood Glue
- Miter Saw
- Table Saw
- Wall Screws
STEP 1 – STAIN THE CABINETS
Our first step was to stain the cabinets. They were originally a very light unfinished pine, and I wanted to make them a little bit darker to work with the other wood finishes in this room. Our Provenza LVP floors have a white oak look with some darker warm brown and gray tones, and there are a few other light to medium wood finishes in this room.
The wood stain we used was Varathane Golden Oak. We applied one coat and wiped it off as applying it so it didn’t soak in too much. We applied the stain to all sides of the cabinets and doors.
STEP 2 – CUT THE WOOD MOULDING PIECES
After staining, we measured and cut the wood moulding pieces that would frame each door. We had four doors in total that would be framed.
We purposefully made the shorter pieces slightly longer than the actual doors, in order to cover the gap between the doors, which is standard on these Ikea Ivar cabinets. Now, when there doors are closed, the gap is not visible!
We used a miter saw to cut all of the trim pieces with a 45* angle.
STEP 3 – CUT OUT NOTCH AT BACK OF MOULDING PIECES
We wanted the wood moulding pieces to look like they were sitting flush on the existing cabinet doors, so we had to notch out a spot for the grasscloth material on the back side of the moulding, so you wouldn’t be able to see the thickness of the grasscloth underneath the moulding. We used a table saw to create the notch by setting the height of the saw blade to match the thickness of the grasscloth, and ran each piece through multiple times until the notch was wide enough to sit on top of the edges of the grasscloth (about 1/2″ wide).
STEP 4 – STAIN WOOD MOULDING
After all of the moulding pieces were cut, we stained them. We waited to stain these pieces until after they were cut to ensure all of the cut ends were also stained.
Again we used Varathane Golden Oak.
STEP 5 – CUT THE GRASSCLOTH MATERIAL TO SIZE
This part is a little specific to our project, because I actually used some grasscloth material from a roman shade window covering. So I had to take apart the window covering to remove the grasscloth material. I had accidentally ordered this window covering in the wrong size for one of our windows so we had no other use for it! I’m so happy I was able to repurpose the material.
Here are a few other Grasscloth Material Ideas that you could use to achieve a similar look:
I measured each door and cut the grasscloth with scissors. I used masking tape to mark where I needed to cut, and cut right through the tape so that it stayed on the material until I was ready to attach it to the doors. This way the tape held the grasscloth together while I was cutting and prevented it from fraying. The material I was using frayed very easily, so I made each piece slightly bigger than I really needed it, so that I could trim it down to size once I had it attached to the doors.
STEP 6 – STAPLE THE GRASSCLOTH TO DOORS
We used a staple gun to attach the grasscloth to the doors, making sure that the staples would be hid underneath the wood moulding pieces.
STEP 7 – GLUE THE MOULDING FRAME TO THE DOORS
Once the grasscloth was attached we used wood glue to attach the moulding pieces onto the doors.
Use clamps to hold the pieces in place while the wood glue dries.
Because the moulding pieces on the inside edges of the doors were slightly overhanging the existing doors, in order to hid the gap between the doors, there was not enough surface area for the wood glue alone to work. So we used a nail gun to secure those pieces.
STEP 8 – INSTALL THE DOOR PULLS
We attached these 6″ black pulls to the doors, centered at the middle of each door.
STEP 9 – HANG THE CABINETS
Instead of adding legs to the cabinets, we decide to hang them on the wall. I like how clean and simple it looks, and it’s easier to clean underneath! The cabinets are hung about 8″ above the floor.
NEXT STEPS:
To finish these cabinets, we plan to use a thin piece of wood to fill the gap in between the two cabinets. We will also add some sort of top that will go across both cabinets. This will really finish this project and make the two cabinets look more like one long unit. I’ll post an update here once we have completed this part of the project!
This DIY Ikea Ivar Tv Console Hack was a very simple DIY project and it really made these basic and inexpensive cabinets look more custom! This was also a very affordable way to update these Ivar Cabinets!
Love how they turned out!!
Thanks!!