This post shares all about our 1970’s Kitchen remodel, including before and after photos and my top Kitchen Design Must Haves for 2021!
It has always been a dream of mine to fully design my own Kitchen! Before our offer was even accepted on this house, I was already busy sketching possible layout ideas! Removing walls and shifting the appliance and plumbing locations…it was all so exciting!
The original Kitchen in our 1970’s tri-level fixer upper was small and dark, and the main level layout wasn’t super functional. It definitely needed some help! The kitchen was one of the first areas that we remodeled in this house and it made the whole house feel different, in the best way!
Below I’m going through every little detail of our Kitchen remodel! It took me a while to put this post together (our Kitchen has been complete for about 8 months now) but I wanted it to be as detailed as possible! Below I’ll share the before and after photos of our Kitchen remodel, all of the finishes we selected, details about the appliances, cabinets and more!
This post contains affiliate links. See our Disclosure here.
Our 1970’s Kitchen – Before
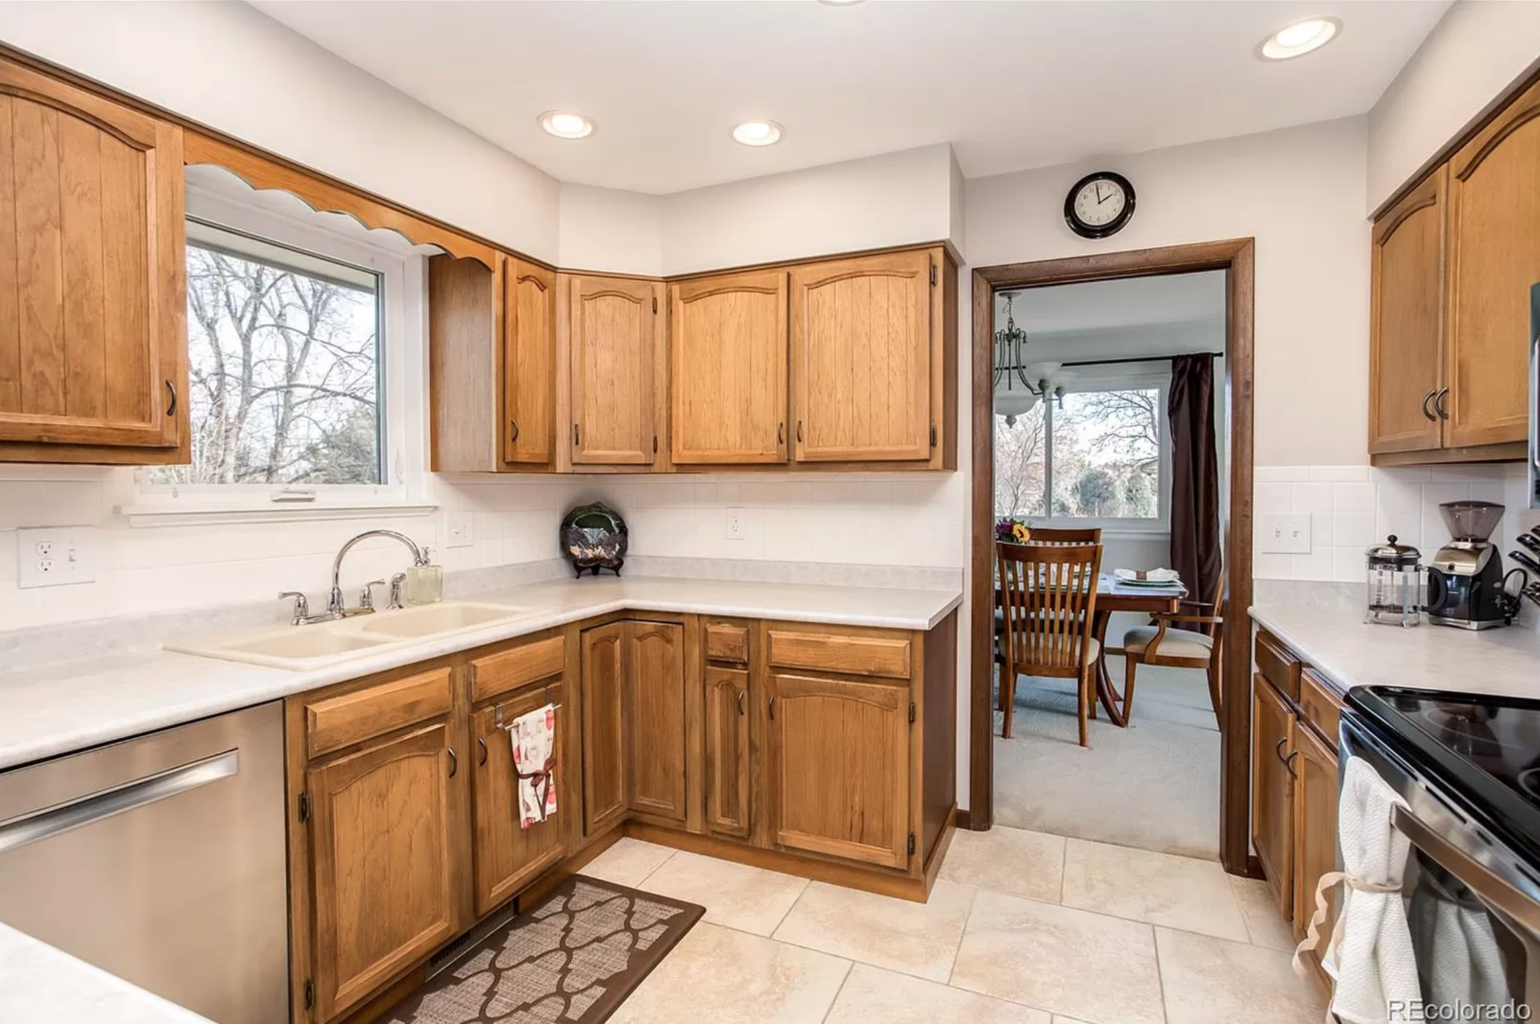
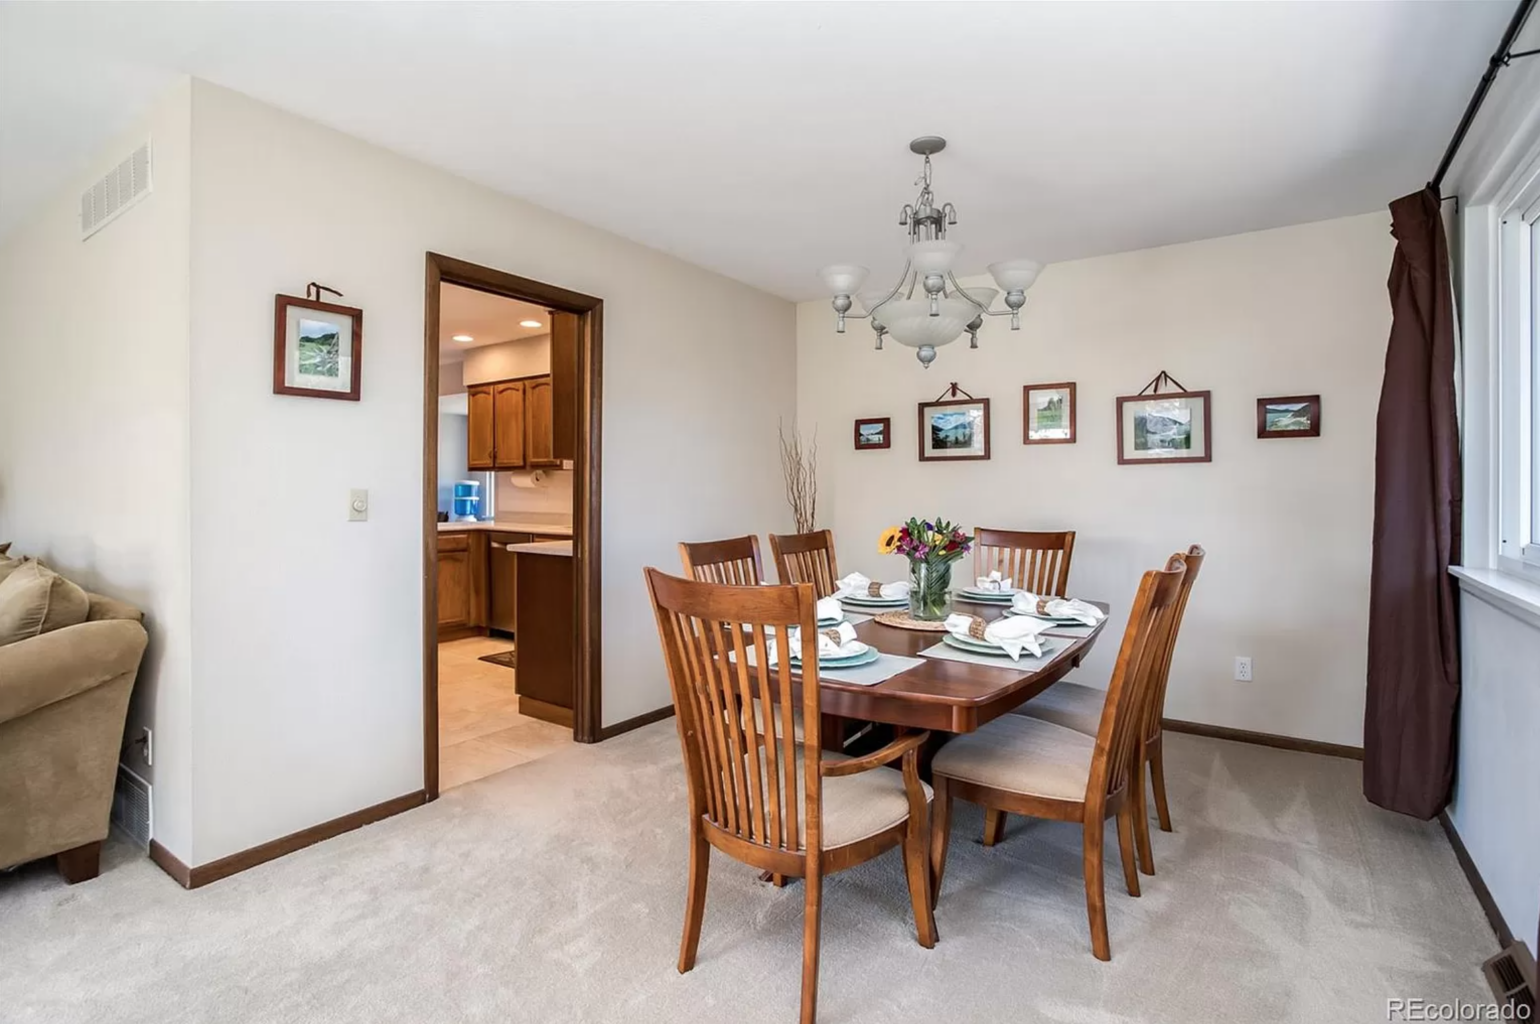
When we bought our 1970’s tri-level fixer upper, it felt dark and compartmentalized. The Kitchen was small and towards the back of the house. There was a small, separate formal Dining Room off to the side, and a long and narrow Living Room near the large window at the front of the house (the best window!).
There was a lot of space that felt wasted or unusable. And the large beautiful window at the front was barely seen from the rest of the house! There were also a few walls that blocked so much natural light from getting back to the Kitchen.
The Kitchen was closed off and didn’t get much natural light. It was small, but actually did offer a decent amount of storage space. However, no island or room for barstool seating, which is a must have for our family!
The main reason that this Kitchen was in desperate need of an update, was because it looked as though it hadn’t been touched much since it was built in the 70’s!

But, this was all actually a big reason that we decided to buy this house! I was so excited about being able to completely re-design it! If we would have boughten a home with a newer Kitchen, it would have been harder to justify a full remodel. This way I was able to have complete freedom and select everything I wanted (within budget of course)!
Existing Kitchen Design Issues
Before we even closed on this house, we already had a plan in mind for the Kitchen remodel. However, we weren’t exactly sure what we could and couldn’t do right away, before having our contractor over to take a look. Below are the main issues we had to think about.
- Existing Walls
- Our hope was to remove all of the existing walls so we had to figure out if they were load bearing. We determined that they weren’t (yay!), but they did house some electrical work that had to be located somewhere else (like light switches and the thermostat), and an air vent that needed a new home.
- Existing Plumbing Locations
- The existing sink was located under the window and I was hoping to move the new sink and dishwasher to the new island in the center of the room. Luckily, below this room is our basement which has a dropped ceiling, so it was easy for our contractors to relocate the plumbing!
- Existing Window over the Sink
- The window that was over the existing sink didn’t fit into the new layout plans, so we planned to patch it up. This was actually much easier than I thought it would be so I’m glad we went for it. Although, it was a cute view and I wish we could have made it work!
- Other Kitchen Design Issues
- Old and Outdated
- Too small / not enough storage space and countertop space
- No room for barstools
- Dark / Not Enough Natural Light
Kitchen Design Plan and Must Haves
The first part of this Kitchen remodel that I worked on was deciding on a new layout for the whole main level. This was one of the most challenging parts of the remodel, mainly because we weren’t exactly sure what we would be able to do with the existing walls right away.
Below is the original floorplan and the new layout that we decided on. If you’re wondering…the program that I use for floorplans is AutoCad.
We ended up removing all of the existing walls and opened this whole level up! I am so happy that we were able to do this because it really changed the feel of the whole house.
Removing the walls brought so much more natural light throughout this area. It also made it feel larger and more functional.
We were able to increase the size of the Kitchen, add in a huge island, and keep a Living Room area next to the Kitchen. It also opened up the Entry way.
I went through many floorplan ideas and even wrote a whole blog post about the different Kitchen Layout Options HERE.
Once we decided on a layout, I built a 3D model of the space in SketchUp. I highly recommend doing this (or paying a designer to) if you can because it really helps you get a better idea of what the space will actually look like! You can even add in some furniture and lighting that is similar to what you want, and the finishes/colors/patterns that you like to see how everything will work together.
Now that we had determined the layout, I needed to finalize the cabinetry, appliances, finish selections and other design details. After looking for inspiration, researching different Kitchen trends and ideas, and thinking about what would work best for our house, I came up with a few Kitchen Design Must Haves:
- Large Island to seat at least 4
- We are a family of four and love to sit at the island together to eat. It feels easier, with two small kids. I also love that the kids can sit there and eat breakfast in the morning while I’m in the Kitchen, or they can sit there and play while I’m making dinner.
- Steam Oven
- I’ll talk about this more in the Appliance section below…but this is something that has been on my dream Kitchen wish list for so long!
- Large Farmhouse Sink
- I’ve wanted one of these for so long! I love the look and knew I had to work it into the Kitchen Design.
- Open Shelving
- I feel like this is one of those things that people either love or hate in Kitchens! I personally love opening shelving in Kitchens! We added floating shelves to the Kitchen in our first house and they were so pretty and convenient, so I knew I wanted them again here!
- Custom Hood Cover
- Since we were going all out with a custom Kitchen I knew this was something I wanted to include! It didn’t cost much more to build and I love how custom it looks.
- “Marble” Quartz Countertops
- I love the look of marble, and would have loved to have real marble countertops, but was too nervous as we have two young boys! Marble can be high maintenance and stains easily…but quartz is the most durable and easy to care for material you can find! And there are so many great options now that look so similar to marble.
- Contrasting Finish at the Island
- I love the look of different cabinet finishes in a Kitchen. I think it makes the whole space feel more custom and unique!
- Clean and Classic Style that flows into the Living Space
- Since our Kitchen is so open and close to the Living Room, I wanted it to be a seamless transition. I love when the cabinets look more like built-ins and the appliances don’t stand out so much!
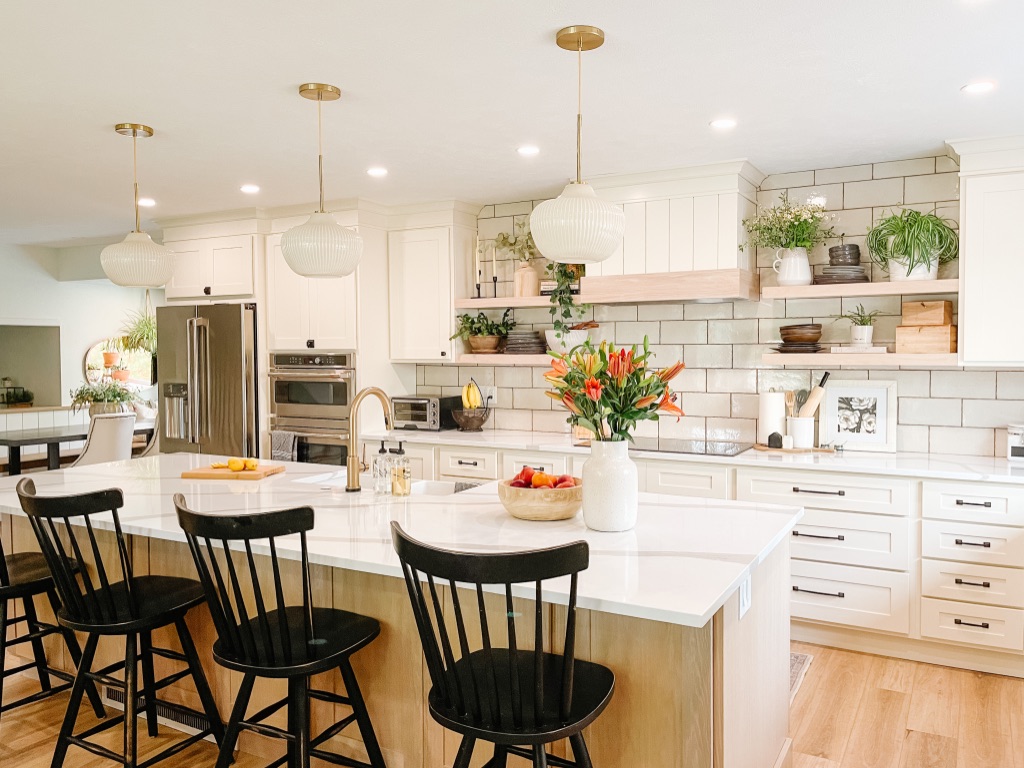
Our 1970’s Kitchen Remodel – After
Can you believe this before and after?! I can’t believe how different this house feels now! I’ll go through all of the details of our Kitchen remodel below.
Kitchen Cabinets
I’ve always loved the look of two-toned kitchens and contrasting finishes at Kitchen islands! I also love the warmth and character that wood finishes add in Kitchens. I knew from the beginning that I wanted white oak cabinets at the island, so that was key when looking for a cabinet company to work with.
It turned out that the white oak finish I was looking for was hard to find in semi-custom cabinets. Most companies only had red oak (which is darker and warmer) and that was not what I had in mind. I prefer white oak as it is a little lighter and has less orange/red tones.
So, I was so excited when my brother-in-law (who was also our contractor) recommended Schroll Cabinets! They offered the perfect white oak finish in their semi-custom line! They actually have a few different white oak finishes that are all beautiful.
Schroll Cabinets was so easy to work with and I have been very impressed with the quality of the cabinets. They are a local, small business based out of Cheyenne, Wyoming. There are a few showrooms in Colorado as well. They are also passionate about the environment and sustainability, which is important to me, and have earned the Environmental Stewardship Program certification.
We chose a simple shaker style for the doors. I love that it is simple and clean, and can lean either modern or traditional.
For the painted cabinets around the perimeter of the Kitchen we chose a creamy off-white color called Oyster. I wanted white cabinets in here to keep the room light and bright, but I love the warmth that the creamy white color brings in. they still feel light but cozier and softer than a bright white color.
For the wood cabinets at the island we chose the finish Draught. It is a slightly white-washed / pickled oak finish that feels light but still has some warmth.
The floating wood shelves were also made by Schroll Cabinets so they match the wood at the island cabinets.
One design decision we made early on was to have mostly drawers for the lower cabinets. They are so much more convenient than doors because you can store all of the same items in them but they are easier to open and you can see everything clearly. We only have two lower cabinets with doors and I wish we would have just done drawers everywhere!
At the lower corner cabinet we added a lazy susan so you can get to everything in there! We keep all of our other random Kitchen appliances in there.
I love this set of extra deep drawers next to the oven. They are perfect for large appliances or pots and pans! We keep extra fruits and vegetables in the top drawer and our blender and panini press/grill in the bottom drawer. I actually wish we did two more of these extra deep drawers!
This pull-out trash/recycling cabinet has been so nice to have because it is easy to use, keeps the trash hidden, and the two cans inside are a really good size.
At the back side of the Kitchen island we added a row of 12″ deep cabinets. They are great for extra storage space for items we don’t use as much, like paper plates and plastic wear for parties and holiday/seasonal items. We also use one cabinet for some arts & crafts supplies for the kids, and another for small electronics like tablets. We added a few outlets inside of these cabinets for the chargers!
One of my favorite parts about the Kitchen cabinets is the hardware we added from Rejuvenation! I wrote a very detailed blog post all about the styles we chose, with Tips on How to Mix and Match Kitchen Cabinet Hardware HERE!
CLICK AN IMAGE TO SHOP OUR KITCHEN CABINET HARDWARE:
Kitchen Countertop
I love the look of marble but did not want to have to deal with the maintenance of it, especially with two young boys! So we went with a quartz countertop with a marble look. I love the large dramatic veining and it is so durable! The countertop is Arabescato from Pental Quartz.
Kitchen Backsplash
It took me FOREVER to pick out a backsplash tile that I loved. I wanted something neutral and pretty simple. Nothing so trendy that I would get tired of it in a couple years. But I also wanted it to be a little unique! In the end I’m so happy that I looked all over because I’m obsessed with what we chose!
TIP – make sure to order tile samples, or look at it in person, before placing an order! I probably went through 20+ samples before finding one I loved that worked well with the cabinets and countertops.
I love this backsplash tile because we installed it in a classic subway style, but it is oversized, and the edges have a worn terra-cotta tile look. The beige color also works perfectly with the Kitchen cabinets and pulls a warm gray out of the veining on the countertops as well.
For the grout we used a dark brown color that is similar to the exposed edges on the tile.
Kitchen Appliances
Ok these appliances were a HARD decision to make! They are such a huge investment and it can be very overwhelming making sure you are choosing the best options! I felt like I had an upper hand, because being an interior designer, I’ve done so much research for clients, gone to many appliance showrooms, and attended multiple product presentations and demonstrations. But, new products come out all the time and it is hard to keep up!
We ended up going to a local appliance showroom to talk to a sales person about our options and learn about any new models. Unfortunately we did not have a good experience so I would not recommend this particular showroom. It’s a shame too because I have been to its sister store in a different town and had a great experience.
However, I would still recommend going to a few appliance showrooms to see the products in person and talk to someone about your options. Many showrooms offer demo cooking classes so you can use the cooktops and ovens before deciding too. It is always a good idea to shop around for appliances as well to make sure you are getting the best deal.
REFRIGERATOR
We strongly considered splurging on a large built-in, side-by-side column refrigerator, but decided to save the money and I’m happy we did. It would have taken up too much space and wouldn’t have been worth it since we have an extra fridge in the basement.
Went with a GE Cafe French Door refrigerator and have been happy with it so far! I was hesitant to get the counter depth size because I was worried it would be too small, but it’s a great size, and I love that it looks more built-in because it doesn’t stick out too far. We had the cabinets built around the exact size of the fridge so there are no gaps and it looks great!
OVEN AND MICROWAVE
Since these are right next to the fridge we went with the same GE Cafe line. On the top is the microwave but it also can be used as a convection oven or a toaster oven! Definitely comes in handy for holidays and big dinners. On the bottom is a convection oven. Both have been great so far!
REFRIGERATOR DRAWERS
These are one of my favorite parts of the Kitchen!! I am so happy that we splurged for these. The best part about these Refrigerator Drawers is that they can be used for both beverages and food.
Each Refrigerator Drawer has a separate temperature setting. So you could use the top drawer as a wine cooler at a warmer setting, and use the bottom drawer at a cooler setting for meat or produce. Wine and beverage refrigerators typically don’t have cool enough temperature settings to store food, so I love that these drawers are able to store anything a normal refrigerator can. They are great to have when entertaining, to store drinks, and for storing snacks for the kids!
We went with the ‘panel ready’ version and added our cabinet drawer fronts so they blend in with the rest of the cabinets!
STEAM OVEN
This is probably my most favorite part of the Kitchen!! A steam oven has been on the top of my dream kitchen wish list since I first heard of them while working on a high-end custom home years ago! Steam ovens are very popular in Europe but not as much in the US for some reason. I’m actually shocked that they haven’t gained more popularity here because they are AMAZING! I will never live without one again!
This steam oven is so versatile because it can be used as a normal convection oven, or as a steam oven, or as a “combi-steam” oven where it is like a convection oven but with added steam so whatever you’re cooking stays moist (sorry, haha) and doesn’t dry out.
One of the best features is being able to steam veggies and potatoes quickly! Cooking with steam is the healthiest way to cook – no need for oils, and it’s fast! Having a steam oven also helps me avoid using the microwave as much…which I try to use as little as possible! I can use my steam oven to reheat leftovers; quicker than a regular oven and the food doesn’t dry out and tastes great!
I seriously love this oven!! It was definitely an investment but to me it was so worth it. Make sure to do your research if you are considering one! There are lots of different options – sizes, voltage/power, functions, plumbed vs. non. plumbed… We decided to get the non-plumbed version because I have heard of people having issues with the plumbed ovens (where they are hooked up to a water line). So ours has a container that you fill up, probably every three uses and it’s quick and easy.
If you have any questions at all about STEAM OVENS please let me know in the comments below and I’d be happy to talk about it more!
INDUCTION COOKTOP
This is another appliance that we are soo happy with! An Induction Cooktop has also been on my wish list ever since seeing them during an appliance showroom tour! They are seriously amazing!
I think so many people think induction cooktops are the same as electric, but they are so different. While electric stoves heat the surface of the cooktop with electric coils, induction cooktops use electromagnetic currents to evenly heat the pot or pan, which in turn heats the food faster, and uses less energy. They boil water in about half the time as gas cooktops!
Another plus is that they are sooo easy to clean! It is a flat surface and I love how it doesn’t stand out on the countertop. Our old gas cooktop was such a pain to take apart to clean.
I’d say the only cons of an Induction Cooktop is they can be more expensive, and you can only use pots and pans made out of certain materials (stainless steel, cast iron, carbon steel). This was a splurge that was worth it for us though! And all of our pots and pans work on it so that worked out too!
VENT HOOD
The vent hood insert has been great and I love the look of the custom cover! We used shiplap and painted it with the cabinet paint so it matched the cabinets, and then the wood trim at the bottom is the same wood finish as the island cabinets.
DISHWASHER
We kept the dishwasher that was already at the house when we bought it since it was in good condition! Good way to save money!
Kitchen Sink & Faucet
I’ve always wanted a big white farmhouse sink! I think they are so classic and beautiful. I probably would have done a single basin sink, but my husband is the one that does the dishes and wanted to basins..so he won! haha. We debated doing a second sink and decided not to, but now I am wishing we would have put one in. It would be nice to have a second sink to water my plants in..but not the end of the world! just something to think hard about before you build because we cant go back and add one in easily now.
We love this gold Kitchen Faucet because it has a touch sensor! So you just have to tap it to turn it on and off! It is so convenient to have when your hands are full or dirty. I also love the gold finish. It’s is a brushed bronze that goes perfectly with our Kitchen island pendants.
Kitchen Resources
- Flooring is LVP from Provenza in the color At Ease
- Cabinets are from Schroll Cabinets – Perimeter are in the color Oyster, Wood at Island are Draught
- Countertops are Arabescato from Pental Quartz
- Kitchen Backsplash Subway Tile
- Kitchen Island Pendant Lights
- Woven Roman Shade from Select Blinds
- GE Cafe Refrigerator with Ice Maker and Water Dispenser in Stainless Steel
- GE Cafe Oven / Microwave Como
- GE Cafe Induction Cooktop
- Kitchenaid Panel Ready Refrigerator Drawers
- Miele Steam Oven
- Vent A Hood vent insert
Click on an image to shop the post:
Great job Rachel 👏🏻👏🏻👏🏻 Amazing remodel!
Thanks for sharing about the refrigerator drawers! I would love to hear more about the steam oven, too. Is there a learning curve to using a steam oven? Like, does cook time take more or less? Does food lose flavor due to the steam- so do you need to season more? I had never heard of a steam oven before you mentioned them.
Yes of course! Let me know if you have any other questions about them! I love them and am so happy we included them!
The steam oven is amazing but yes there is a learning curve! I actually still want to go take a class at the appliance showroom to learn more about it.
The cooktime is usually a little bit faster than with a traditional oven! The steam creates a more even temp throughout the oven too. And the food is even more flavorful because it doesn’t dry out so more flavor stays in the food.
I hope this isn’t too nosy but I’m just wondering what this kitchen cost? We are looking at a kitchen reno and are also tearing down walls, moving plumbing and electrical like you did. We have a $60k budget.
Not at all I’m happy to answer any budget questions! It is a little hard to say how much this kitchen remodel cost in total for a few reasons – 1) my brother-in-law was the contractor so we got a great deal on labor, and my husband helped out as well. 2) we were working on other areas of the house at the same time 3) We splurged on some items (like the appliances) and could have selected less expensive options.
In general I’d say $60k is a great budget for a Kitchen remodel though! But it depends on the size of your Kitchen and how involved the plumbing and electrical work is. Our electrical work was a huge part because they had to add a new sub panel and re-route all of the wires that were going through the old soffit. We also moved a lot of plumbing.
A good rule of thumb for a remodel is that the labor will cost about as much as the materials do (So if your materials are $30k the total remodel cost will probably be about $60k).
Love this Rach! So beautiful!
Thanks so much!
Such a beautiful transformation!
Thank you so much!
It’s so cool seeing the before, design, renderings and then final outcome. You designed this so perfectly. It’s a dream kitchen! We also have refrigerator and freezer drawers and love them !!
Thank you! I love looking back at that too! It’s so cool how the rendering looks so similar to what we ended up with! And the refrigerator drawers are the best!
Looks great Rach! You have such a good eye and design sense! Both you and Kaylee are doing a great job on your blog!
Thank you Regina! It’s so much fun!
OMG everything about your kitchen is perfect. So beautiful ❤️
Aw thanks Brooke!!
It turned out great and is such an awesome transformation from the before pictures!
Thanks so much! Sooo different!
Your kitchen is STUNNING! Thank you for taking us along through the transformation!
Aw thank you so much! It’s been such a fun project!
I love it all! How did I not know about the refrigerator drawers? That’s amazing!!! and now I totally want to look into a steam oven. So neat! I’ve never heard of that before. I’m always blown away at how much the space transformed.
I think I was lucky to learn about all those appliances because of interior design projects I’ve worked on! I’m always so surprised they aren’t more popular … they are an investment but so worth it in my opinion! And thanks so much!
Your kitchen is beautiful and you did an amazing job. Enjoy!!!
Thank you so much!
Amazing job!
Thank you!
Ah it looks so amazing! I love how you were able to see the potential in this space and then transform it into something so functional and beautiful.
Thank you! Definitely better than it was!
Such a beautiful kitchen renovation!! Great job Rachel!
Thanks so much!
Loved this and so jealous of your kitchen!
Aw thank you! We love it too!!
I am absolutely in love with your kitchen! This transformation is so stunning! We are looking for inspiration for our big cabinet refinishing project that we have coming up and I’m definitely bookmarking this post. I’m still just blown away by how amazing your kitchen looks!
Thanks for the kind words!
Thanks for sharing your beautiful kitchen; from design to finish. We’ve been in our new home after selling our first home for about 6 months for bigger space. I can totally see in your kitchen design some ideas for my kitchen remodel in the future. The value of your home has already increased by thousands. Great job
Thank you so much! I’m glad it was helpful!
I love this kitchen! Great job! I love your design style and really appreciate the budget-friendly advice. I’m in the middle of a kitchen remodel myself. First time after being in the house for 20 years.
Already picked the big stuff (white cabinets, Cafe appliances, Provenza LVP floor). Now little things…I hope you can help, please. How tall are your baseboards and how did you handle the style/color transition from kitchen to the other open areas? Thank you so much!
Thank you so much and congrats on your kitchen renovation!! Our baseboards are 6″H. The kitchen blends with the rest of the house with the same Provenza floors throughout the main level, and the walls throughout the house are Sherwin Williams alabaster, which is close to the color of the Kitchen cabinets. Hope that helps!
Great job on your remodel!! I too have a 78’ house that is being worked on my husband is definitely and Jack of all trades. We have torn down the walls from our kitchen to dinning room “wow” what a difference. I’m having a problem with picking out cabinets we have hardwood floors in our entryway leading to the kitchen and dinning room floors so I’m wanting to put the same in the kitchen . Would you know of a desktop software were it shows the layout of the colors in the design. I don’t have a huge budget I’m like you I’m trying to be resourceful. Our project will start in the spring. If you have any other tips I would appreciate it .. thank you Rachel.
Hi, thank you so much! I’m not sure what kind of software you are referring to…what are you wanting it to help with?
Hello Rachel,
Wow!! You kitchen is gorgeous! I have almost the exact layout of your Before pics, except in a couple of areas. My “breakfast nook” lines up with the kitchen; I do not have those extra feet that jut toward the backyard. Also, my front door is on the ground level, down five stairs to the same level where the back French doors lead to the backyard.
So…a couple of questions…I have thought about removing the wall between the kitchen and the dining room as you have, but that means my ground floor and first floor (I have a tri like you) would be totally open from end-to-end.
Also, from your downstairs looking into the kitchen, I have a 1970s wooden rail. You put your dining room table bench there against a wall. In my home, I enjoy seeing the entire kitchen window from my downstairs living area. Putting a low wall, while absolutely is beautiful in your pics, would block a good portion of my view of outside from downstairs, not to mention the light too. I assume for you, the loss of view was worth it.
I would actually like to cut the granite in my kitchen that forms the U shape on the right (when facing that back window that you covered), and make a long island that goes parallel with the windows to create a better flow for guests and more stool space. My U shape can only fit three stools now and we are all facing the oven ☹️ (which in your home is the wall where the door was to your dining room).
It is true though, the kitchen is the main hub. When guests come over, they all hang in the kitchen until I bring the meal downstairs to the table. I am trying to make the kitchen more accessible with a long island as opposed to a U-shape where more than three people in the U feels crowded. However, on the other side of the U, only three can sit down. For the moment, I don’t have a table on the left of the U side, only a space of about 8’x 5.5′.
I know you are busy, but any thoughts would be appreciated.
Thanks, jane
Hi Jane, Thank you for reading! It would be easier to respond to you on Instagram, would you be able to send me a DM there? I’m @sprucingup.mamahood
Also maybe check out my kitchen layout options post for more ideas? I played around with removing and keeping different walls – https://sprucingupmamahood.com/kitchen-layout-ideas-remodel-update/
So pretty! Looking at your original kitchen, it looks like you have a duct above your cabinets. Is that the case?
We just bought a 1970s townhouse and the kitchen looks JUST like that. I thought it couldn’t be removed, but it looks like you did? What was in there? Would love to know that and the cost!
Hi! Yes there was a duct in that wall that we removed, and there is now a vent at the base of the island (on the side where the barstools are). Sorry it is hard to estimate the cost for just that part!
I have been struggling with “vision” on my long-overdue kitchen reno on my ’69 colonial and I you NAILED this setup and I think I may just share this link with my “guy” and tell him THIS is perfection.
I have a similar K/DR/LR first floor layout and I’m lucky to have a small family room off the kitchen (opposite side as the DR)
I’d love your opinion on losing the living room. I NEVER sit in the LR so IDK why I’m even worried about missing it but that is what has kept me from taking the leap. Any thoughts on losing the living space? Also I see a TV in one of your pix but can’t tell which part of the space that is directed for viewing.
Your thoughts are
I think you might have messaged me on Instagram and saw the small living room area off the kitchen, right?? If that wasn’t you please let me know!
Does your brother-in-law happen to do remodels in Colorado Springs?
No sorry only in the Denver area right now!
WE HAVE A 200 YR OLD FARMHOUSE WE ARE PURCHASING AND WILL BE COMPLETELY GUTTING IT. WE ARE IN KS AND I KNOW IT’S A LONG SHOT BUT DO YOU GUYS DO ANY OUT OF STATE REMODELS? I WOULD LOVE TO SEND YOU PICTURES IF YOU NEEDED/WANTED TO SEE THEM.
Hi, I do offer remote interior design services if you are still looking for help! Feel free to email me – hello@sprucingupmamahood.com