Sharing how our baby boy nursery with wallpaper is looking with colorful peel and stick wallpaper and contrast trim and ceiling!
With baby boy number 3 due in a few short weeks, the countdown is on to finish his nursery! I love coming up with design ideas for kid’s rooms and nurseries because they can be so fun and playful. A few months ago, I started thinking of a design plan for his nursery, and have been so excited to pull it all together.
I knew I wanted to incorporate peel and stick wallpaper and some fun colors, and then after painting the ceiling in my oldest son’s new room, I knew I wanted to paint the ceiling in this nursery a darker color as well!
Below I’m sharing how our colorful boy nursery with wallpaper is progressing – how it’s looking now and what is still left to do!
This post was sponsored by Tempaper & Co. and contains affiliate links, which provide me with a small commission from each sale at no extra cost to you; see the full Disclosure here. All thoughts and opinions are my own. Thank you for your support!

Boy Nursery – Before
This room had been my youngest son’s room since we moved into our home about 3 years ago. It is the smallest bedroom in the house so worked perfectly with a crib, but once he needed a bigger bed it felt a little cramped. So, we had our two boys move into new bedrooms (Roman moved into Griffin’s bedroom and Griffin moved into a new bedroom) so that we could turn this room into a nursery for the new baby.
I hadn’t really touched this room much since we moved in, other than painting the sun mural on the wall (which I loved!). As much as I loved the big sun mural, this room needed a makeover.
Updating our Boy Nursery with Peel and Stick Wallpaper and Contrast Trim
Installing Crown Moulding and New Trim
Our home is a 1970’s fixer upper that we have been updating since we moved in, and this bedroom still had the original trim. As we work on each room in this house, we’ve also been updating the trim with a taller, more modern profile. It’s a little change but I think it makes a big difference in the overall look of the room!
I went back and forth on what color to paint the trim and doors, and if we should paint the ceiling with the same accent color or not. I also wasn’t sure if it should be a light or dark color, but I wanted something that coordinated well with the wallpaper so tried to pull from the colors in that.
The color we ended up choosing is Sherwin Williams Underseas and i love how it turned out!! It works so well with the wallpaper and is a really pretty, rich teal color. The wallpaper it self is pretty gender neutral and you can make it feel more feminine or masculine depending on which accent color you choose (pink, yellow, green, blue…) there were a lot of different ways we could have gone with the accent color but I’m very happy with how the teal turned out.
Paint and Trim Details:
- Trim and Door Color: Sherwin Williams Underseas in eggshell
- Ceiling and Crown Moulding Color: Sherwin Williams Underseas in flat
- Base Trim – 6″H Primed MDF
- Door and Window Trim: 4″H Primed MDF
- Primed MDF Crown Moulding
Check out how we updated our flat panel doors here!
Installing Tempaper Peel and Stick Wallpaper
I love the peel and stick wallpaper that we chose – it really makes an impact in the whole room, yet still feels soft, gentle, and calming – perfect for a nursery! I love the mix of colors and the organic feel of the brushstrokes.
This peel and stick wallpaper from Tempaper is great quality and very easy to apply. It even works well on our textured walls!
Below is a video with some tips on how to install this peel and stick wallpaper. It also shows the progress and some more before and afters of this room. Let me know if you have any peel and stick wallpaper installation questions in the comments below!
One helpful tip, is to make sure your first piece is perfectly level vertically. We used a laser level on the wall to line up the paper (see video above). Don’t worry about lining the top of the roll up with the ceiling because that is rarely level. It is best to line the wallpaper up vertically, leaving some extra at the top and bottom that can be trimmed off when you are done.
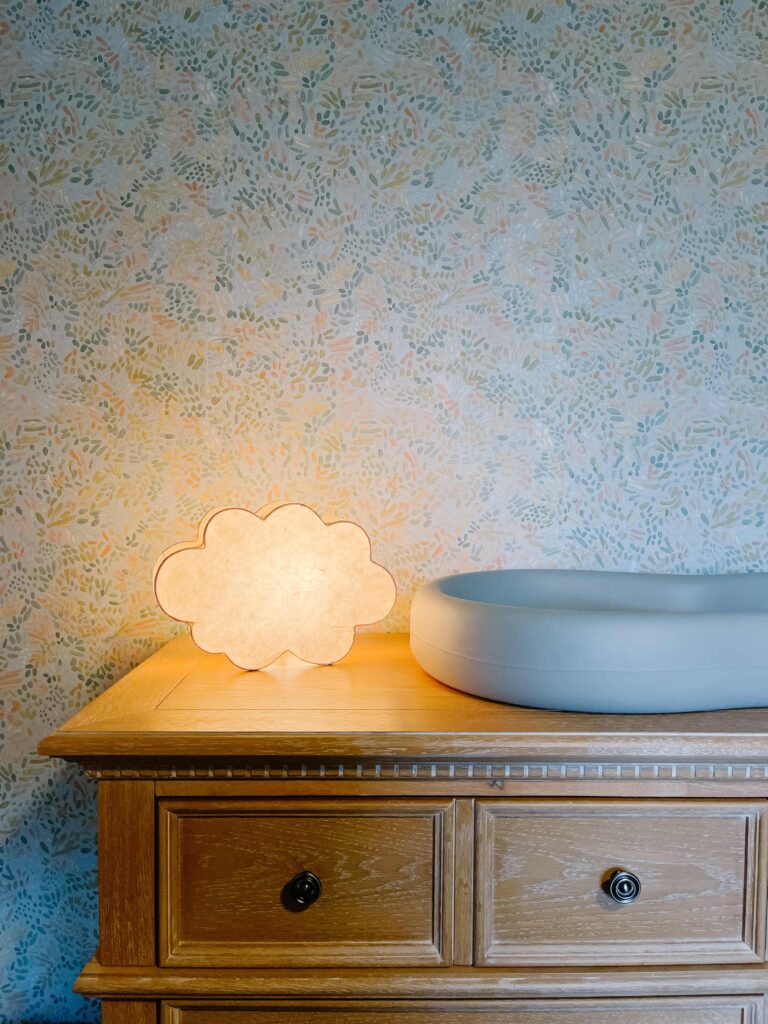
The wallpaper looks so pretty paired with the natural wood tone of this dresser!
Boy Nursery Blue Contrast Trim and Painted Ceiling
I love how the wallpaper looks with the teal contrast trim and painted ceiling! We have 8′ high ceilings, and I was a little worried about painting the ceiling a darker color in this small room, but it feels so cozy and inviting!
Also, because this is a small room (about _ x _) I’m happy we went with one color for the trim and ceiling instead of two separate colors. I think that would have felt too busy in here.
The crown moulding really elevates the feel of the room too and provides a nice stopping point for where the wallpaper meets the ceiling.
I also love the combo of these gold velvet curtains with the wallpaper and teal contrast trim. These velvet curtains are so soft and luxurious looking and are a great price for the quality on Amazon! They are also room darkening so perfect for a nursery or kid’s room and come in a ton of different colors and lengths.
Boy Nursery Design Plan and Remaining Updates
I still have a few things left to finish in this room, but overall it is looking so cute! Pulling this room together has made me so excited for our baby boy to arrive! I can’t wait to rock him to sleep and read him stories in here. It already has such a cozy feel that I find myself sitting in there alone just to relax.
Above is the original nursery design board that I put together a few months ago. It’s fun to see how similar it is to the final design.
Products from Boy Nursery Design Board:
- Crib
- Area Rug
- Dresser
- Glider / Recliner
- Checkered Basket
- Side Table
- Floor Lamp
- Mirror
- Curtains (Spiced Rum)
- Ceiling Fan
- Wallpaper
- Paint Color
That’s an update on the design of our boy nursery with wallpaper and contrast trim so far! I’d still like to add an area rug, a side table and different floor lamp near the glider, and more decor in this room to really complete it. I’ll post a full reveal of the finished room as soon as it is ready!
What laser do you use to ensure it’s straight? I’m thinking about attempting my first wallpaper project on textured walls!
We have this one! https://rstyle.me/+dB_mg1F72s6yZzDt298LDQ
Checkout my new post about non-pasted wallpaper too! I think it worked even better on our textured walls!