See how we transformed this small area on the side of our house by adding a DIY Propane Fire Pit Area with Adirondack seating from Wayfair!
This post contains affiliate links, which provide me with a small commission from each sale at no extra cost to you; see the full Disclosure here. Thank you for your support!
There’s nothing I love more than a DIY home project. As soon as I finish one, I feel like I’m already planning another. They’re so much fun and can be so rewarding!
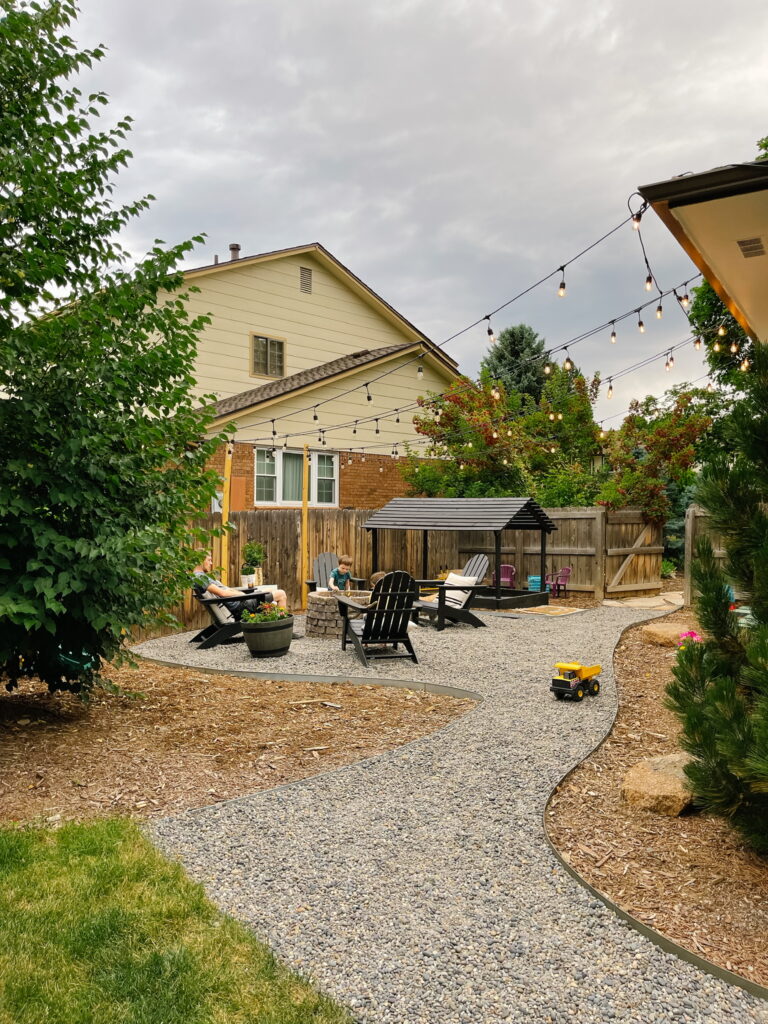
Below I’m sharing all about how we transformed this space on the side of our house into a Fire Pit area! We built a really simple DIY Propane Fire Pit, added some seating from Wayfair and some string lighting over head. I’m obsessed with how it turned out!
Small Side Yard Area – BEFORE
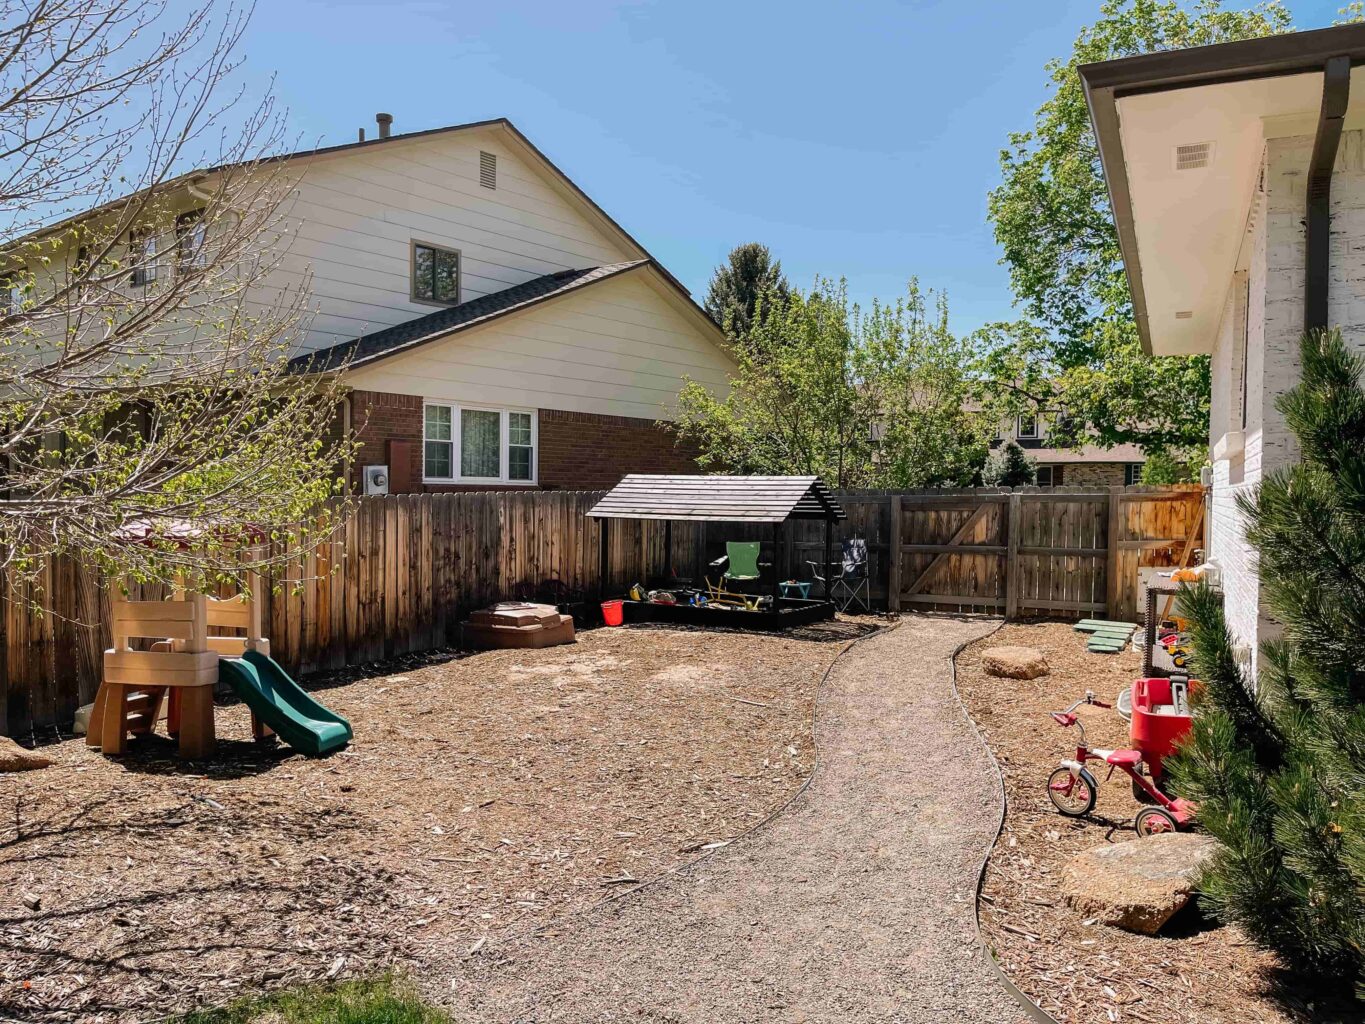
When we moved into our home about two years, this mulch covered side yard area was a blank canvas! We thought about what to do with this space for a while. A greenhouse or garden area, a kid’s play area, a dining area… I even wanted to put a chicken coop here but unfortunately our neighborhood HOA does not allow that.
Ultimately, we decided to turn this side yard into a fun multi-use area, with a play area for our kids, and a fire pit seating area. I loved the idea of having a nice place to sit and relax while my kids played close enough so I could keep an eye on them (these boys are wild haha).
We built the sand box with a roof last year and LOVE how it turned out!! The boys play in it all the time, year round – it was a really great addition to our backyard! After adding the sand box, we decided it would be helpful to have a seating area near it so we could keep an eye on them. I’ve always wanted a fire pit area, so this turned into the perfect spot for one!

See how we built our Simple DIY Sandbox With Slatted Roof here!
How to Build a DIY Propane Fire Pit
Materials
- Stone Blocks
- Paver Base
- Paver Sand
- Landscaping Adhesive
- Fire Pit Ignition System Kit
- Fire Pit Pan and Burner Kit
- Lava Rocks
- Propane Tank
- Decorative Tank Cover
- Gas Range Supply Line (1/2″ tubing and fittings are plenty big for any size fire pit as long as the propane tank will be located within 15′ of the fire pit. If planning on running a longer line, refer online for BTU ratings for pipe sizes and lengths.)
- Hose Clamps
- Gas rated teflon tape
Tools
- Spade Shovel (for trenching unless you have a better tool)
- Rake
- Caulk Gun
- Wrenches
- Hammer
- Stone Chisel
- Level
Step 1 – Level Ground
Start by creating a smooth level surface. The area will be much bigger than expected once you account for the chairs. Measure everything out and give yourself enough room to be able to back your chairs away from the fire pit.
Step 2 – Dig trench for propane tubing
We used a spade shovel to dig a shallow trench between the fire center and the spot where we decided to put the propane tank.
Step 3 – Cut pvc pipe for trench
We had the supplies for making the fire pit before we had the tubing and ignitor system, so we decided to lay a short length of PVC pipe in the trench that was big enough to push the gas line through once it arrived. This way we were ready to start laying the first layers of fireplace bricks while we waited for those parts to arrive.
Step 4 – Fill Trench
Put the dirt back in the trench you dug, however, it is very important to heavily pack the dirt to ensure it doesn’t sink along the trench as things settle.
Step 5 – home flex pipe
As mentioned above, we put a PVC placeholder pipe in while we set the fire pit stones. If you have everything ahead of time, you can bury the Home Flex Pipe directly into the trench. Just be careful not to get any debris inside the tube!
Step 6 – determine diameter of fire pit and dig 2″ inset
We dug out the area directly under the fire pit so we could lay out some paver base and paver sand. This is an important step to give your fireplace a firm base that will not settle or erode with water. Placing stones directly on dirt can see erosion, leading to the fire pit sinking on one side. Before laying paver base, try to make the surface as level as possible to ease later leveling in the sand.
After spreading paver base in the area, spread the paver sand and then use a level to ensure the sand base is smooth and level. The sand base is very important for leveling the first layer of stones by cushioning all the small rocks remaining on your level surface and allowing you to adjust each stone.
Step 7 – assemble the first layer of stone pavers
We used a homemade compass using two nails and a string, but any way you can make a circle for the inner diameter of your burner pan is fine. The first layer of paver stones is the most important layer. This is where you will set the diameter and level of your fire pit. If you have the burner pan, it is helpful to use this in assembling the fire put to ensure fit and roundness.
You should be able to build just about any diameter of fire pit with any stone sizes, but you will need to adjust the angle and gaps between stones to accommodate your specific burner pan. Because the ignitor will be embedded in the fire pit, you want to have it available at this time so you can plan around how it will fit within the circle of stones. You might be able to adjust gaps on all your stones to account for fitting the ignitor, or you may find you need to break a brick in order to fit the ignitor. You should make gaps as tight as possible. but can have gaps as big as 1/2″ without worrying about light shining through fire pit base.
Once you have determined the number of blocks and gap size, re-level the sand base and then layout your first layer of bricks lightly in the sand. Then once the full perimeter of bricks are placed, it is time for the crucial step of leveling and making all the gaps equal. Do this by gently wiggling the bricks into the sand base until they are all flush to each other. Now measure the level of your stone ring and wiggle stones until the entire ring of the fire pit is level.
Step 8 – apply adhesive & assemble second and third layers of pavers
After the first layer, the rest of the stones will go really fast! Put a generous amount of stone adhesive around the first layer, and then place the second layer offset half a brick from the first. We were careful when placing the glue on the each layer to avoid the areas where there would be gaps on the second layer. Also make sure the glue does not leak out once you place the second brick on top of it.
Step 9 – install ignition panel
Depending on your desired height of the panel, and overall height of your fire pit, your number of layers will vary, but just embed the panel into the stones. Score and break a stone if needed to fit the panel as desired. In our case, we were able to adjust the gaps to fit the panel without breaking a brick.
You can use construction adhesive to hold the ignitor in place. The gas line that ran through the ground to the propane tank can be connected now. Ensure to use the yellow gas rated teflon tape on all fittings.
Step 10 – assemble the fourth and fifth rows of pavers
Unfortunately the height of our ignitor was ~1/2″ thicker than the bricks we chose so we needed to chisel off the bottom of the two bricks over the ignitor to keep everything level. If you have a brick chisel this would still be hard, but we used a catspaw/nail puller to chisel the brick which was definitely not easy.
After chiseling the bricks to account for the height of the ignitor, the rest of the 4th and 5th layers went really fast.
Step 11 – install burner pan and check connections
To install the burner pan, we just made the connection between the fitting on the bottom of the pan with ignitor and dropped the pan in place without glue. This is a good time to double check the tightness on all fittings, including those that came already assembled on the ignitor. We neglected to double check those and had to take the fire pit apart to tighten them.)
Once you check tightness of fittings, you can connect the fire pit to a propane tank and do an initial test. Ensure you do not smell or hear any gas running when the propane tank is open and the ignitor is closed.
Step 12 – assemble final row of pavers
Once confident in the function of the burner and ignitor assembly, you can place the last layer of bricks over the rim of the burner. Place glue on the outsides rim of the bricks to account for the thickness of the burner pan on the inside.
Step 13 – fill burner pan with lava rocks
Get enough lava rocks to fill the pan and cover all the stainless steel showing through. It is helpful to build a slight pocket around the ignitor prongs to capture gas to make starting up easier.
For our burner pan, we used about 2 bags of lava rocks.
Adding Landscaping Rock to Fire Pit Area
Once we had the fire pit built, we needed to update the ground material around it. You want a fire-resistant material around your fire pit, and this area was originally covered in mulch.
We used a rake to push the mulch out of the way and created a large round area around the fire pit; large enough to fit the chairs with room to walk around them.
We already had a rock pathway that wraps around our house, and leads from this side yard area to the back patio. I believe the existing material that was used on the pathway was granite chip rock, and it was very sharp and uncomfortable to walk on with bare feet. We knew that we wanted to replace it with a material that would be more comfortable to walk on.
We opened up the existing metal edging on the pathway and created a circle around the fire pit.
We went to a local landscaping material supplier (Ewing off of Santa Fe in Littleton, CO) and I can’t recommend them enough! I will never again buy rocks, sand, mulch, etc. from Home Depot. It was so much less expensive to buy large amounts from the landscaping supplier, and it was very easy to pick it up on our own, with our own SUV. They also offer delivery for a reasonable fee (it would have been about $100 for us) if you prefer that.
I have a ton of stories saved on my Instagram profile under the FIRE PIT highlight if you want to see more about this process!
The first time we visited to get the landscaping rocks, we actually rented a pick-up truck from Home Depot. I do recommend that as well if you need a truck because it was very easy and about $50 to use the truck for an hour and a half (enough time for us to fill the truck with rocks and drop them off at our house).
However, we underestimated the amount of rocks we would need and I ended up going back to Ewing’s a few more times on my own. I filled as many 5 gallon buckets up with rocks as I could fit in my trunk (7) and this was the way to go if you only need a smaller amount! It was much easier to move the rocks from my car to the backyard when they were already in the 5 gallon buckets, vs. dumping the rocks from a truck into the street/drive way and moving them with a wheelbarrow.
We sampled a few different types of rocks to make sure they looked good with the existing materials in our yard, and that they would work to walk on with bare feet. Our top two picks were the Mesa Pebbles and the Mexican Beach Pebbles (see photo below).
We ended up combining the two rocks. If we had an unlimited budget we would have gone with the Mexican Beach Pebbles only, because they are beautiful and so soft. But they were MUCH more expensive (about $600 per ton vs. $100 per ton). The Mesa Pebbles looked very similar but smaller, so they looks great combined together.
Here’s how the path looked with the Mesa Pebbles only …
And here’s how it looked after adding some of the Mexican Beach Pebbles in …
Completing our DIY Fire Pit Area with Seating from Wayfair
Once the fire pit was complete and the landscaping rocks were down, it was time to add some seating! I debated between big comfortable club chairs with cushions, or Adirondack chairs. We ending up going with the Adirondack Chairs because they are durable, easy to clean, more affordable, and still really comfortable! With this seating area being right next to the sand box, club chairs with white cushions probably wasn’t the most practical option.
The Black Adirondack Chairs that I chose are from Polywood, through Wayfair, and they are so nice! They are made out of a recycled plastic resin material so they are sustainable AND super durable. They also come with a 20 year warranty! The black color does get hot in the sun, but I love how it looks, and we usually use this area once this side of the house is shaded anyway.
We also added this propane tank cover that doubles as a side table!
The outdoor pillows are from Target, which is a great place to find cute options.
I LOVE how the string lights turned out!! It might be my favorite part about the whole project 🙂
We attached 1x4s to the fence to add some height and attached the lights directly to those, and then to the house. 2x4s would definitely be better and more sturdy, but we had the 1x4s on hand so we used those. We will probably reenforce them though soon because they are warping a little bit.
More Options for Fire Pit Seating, Tables & Accessories from Wayfair
Here are a few more outdoor furniture options I was considering from Wayfair that would look great at a Fire Pit!
Adirondack Chairs:
Club Chairs:
Propane Tank Covers:
Side Tables:
Large Planters:
Outdoor Throw Pillows:
String Lights & Accessories:
We absolutely love how our Small Backyard Makeover and DIY Propane Fire Pit area turned out!! It made this space on the side of our house so much more usable and I’m out there all the time now!
Let me know if you have any questions in the comments below!
Looking for more DIY inspiration? Get ideas for your next project here:
- The Best Outdoor Patio Furniture
- DIY Pergola: How to Build a Pergola on a Patio with Wood Slat Privacy Screen
- Boy Bedroom Makeover With Simple DIY Board and Batten
- How to Use Tempaper Peel and Stick Wallpaper on Textured Walls and Stair Risers
- Colorful Beadboard Wainscoting at our Small Mudroom
- How to Update an Old Metal Storm Door
This post was all about our small backyard makeover and how to build a DIY Propane Fire Pit.
This Post was sponsored by Wayfair. All thoughts and opinions are my own.
Love how it turned out! The string lights are my fav 😍
Thank you!! The string lights are my favorite part too!
Very nice job. Looks so relaxing.
Thank you! It’s my favorite spot to relax!
Absolutely love how this turned out!!
Thanks Kaylee!!
Gonna attempt to build this. Thanks for the details and how-to!
Yay, thanks!
Hello! Great firepit, I am trying to copy, did you cut a regular tank hose and put that fitting on it on both sides of the yellow gas line?