This post is sharing a simple DIY faux brick wall with an easy 3 step process!
I am so happy to be back to doing DIY projects! This DIY faux brick wall is the first DIY project we have done since Sarelle joined our family 6 months ago! How is she already 6 months old? Time slow down!
Having a baby makes it a little harder to find the time to get these projects done, but luckily this faux brick wall is super easy and took only a few hours over the weekend to finish!
We did have to do it over a two day period because it is hard to get things done while the baby is awake. But it only took us about 2-3 hours each day to complete! Not bad at all!
If you’re looking for a simple DIY that makes a huge impact on the entire room, you’ll definitely want to consider this faux brick accent wall!
This post contains affiliate links; see our Disclosure here.
There are so many different ways to do faux brick paneling. You can paint it, do the German schmear look, a mix of both or leave it as red brick.
I chose to go with the German schmear look!
Even with me narrowing it down to the look I wanted, there are still a ton of different ways to go about getting the German schmear look.
I chose the way that seemed the easiest and cheapest! Both are things I consider with nearly every DIY project we have done!
I am going to share the way I chose and share a few things I learned along the way.
These few tips should help your DIY faux brick accent wall look even better than mine, as I made a few mistakes that I will share and ensure that you don’t make!
3 Simple Steps to Creating a Faux Brick Wall
I am going to make this as simple as possible by sharing 3 basic steps to DIYing a faux brick wall.
Here are the supplies you will need to do this project:
- Brick Paneling
- Spackling Paste (I used 6.5 quarts)
- 6 Inch Flexible Joint Knife
- Impact Driver
- 2.5 inch screws
- Nail gun
- 2 inch finishing nails
- Circular Saw and/or Table Saw
- Jigsaw
- White Caulk
- Caulk Gun
- Liquid nails (optional)
Step 1: Cut the Faux Brick Paneling
Honestly, it’s that simple. But you are going to want to do steps 1 and 2 simultaneously (cut and hang and faux brick paneling). So be sure to read step 2 before starting step 1.
First, you will need to cut down the panels to fit your wall.
Second, you will need to cut your panels to go around the outlets and light switches.
We used a circular saw to make larger cuts (when the panels were full size).
You can also use a table saw (we could not use our table saw when cutting the large panels because it was too wide for our specific table saw, which is why we used a circular saw). We did use a table saw for narrower pieces!
Luckily, because we used spackling to create a German schmear look I wasn’t super worried about a perfect cut since the spackle would cover any imperfections. So the circular saw ended up working out great!
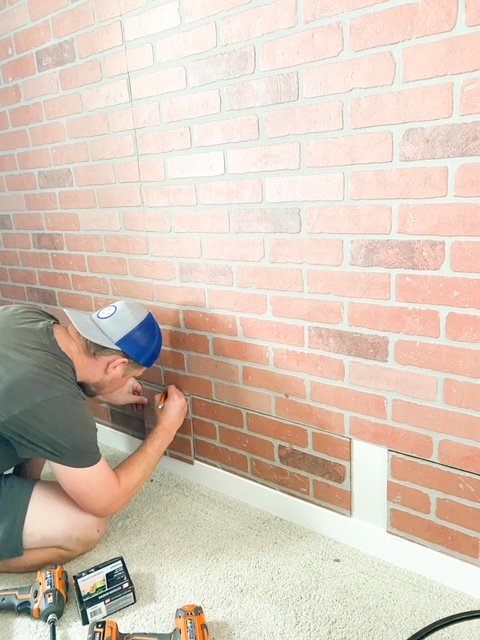
We used a jigsaw to cut the outlets.
We measured and marked on the paneling where the outsets were and drew with pencil the exact shape we needed to cut.
It wasn’t a perfect cut but the outlet cover will cover any imperfections.

Step 2- Hang the Faux Brick Panels
First, we marked all the studs on the wall with a stud finder, level and pencil.
Second, we hung the boards by screwing them into the studs.
You will want to put several screws in each stud. I would do one at the top and bottom of the board as well as another 2-3 in the middle. We only did the top and bottom and wished we would have done more (I’ll tell you why later).
Third, we nailed the boards in with a nail gun.
We went up and down the sides on each board as well as added extras along the studs.
It is very important to add nails all up and down each board along the edges so the seem in as close to flat as it can be! You do not want one board raised higher than the other. I would add a nail about every 6-8 inches.
We didn’t do this in the beginning and we ended up having to go back and add a ton more nails along the edges. The seams kept cracking the spackling because the boards were moving too much.
This is also why I would add more screws along the studs ( like I mentioned above).
Optional step – using liquid nails.
I have seen a ton of people use liquid nails on the back of the paneling so that the panels adhere to the drywall better. This ensures that the panel does not move at all which prevents the seams from cracking and/or showing.
However, we chose not to do this step because we hate committing.
Using liquid nails will ruin the drywall behind the paneling if you ever choose to take it down. I like changing things up too often to ever commit to something that could ruin my drywall.
A lot of people use liquid nails for shiplap too, but we never have!
Although, because we chose not to use liquid nails we should have used a lot more regular nails to begin with. Once you apply the spackling the paneling gets heavy and pulls away from the wall. We had to go back and add nails because of this. Liquid nails would have prevented that from happening.
So it’s your call on how you want to hang your panels.
Step 3 – Spackle The Brick Paneling
You are going to use spackling paste and a 6 inch flexible joint knife to do this part!
First, you are going to want to put a huge scoop of spackling on the joint knife.
Second, schmear it on the wall in both vertical and horizontal swipes until you get your desired look.
I filled in all the grout lines first.
Then I scraped the spackling away from some areas to expose the brick. Other areas I left a lot of the spackling on to make large white areas.
Honestly, you can make it look however you want. Once you get going you will see that it is super easy to achieve your desired look!
This part was honestly super simple! It took me about 2.5 hours to finish the entire wall! I went through 6.5 quarts of spackling. You could definitely do less if you want more brick peaking through.
The seams all covered up super well! You can barely see where they were, you have to look really closely! The only reason we were able to ever see them is because of the cracking I mentioned under step 2.
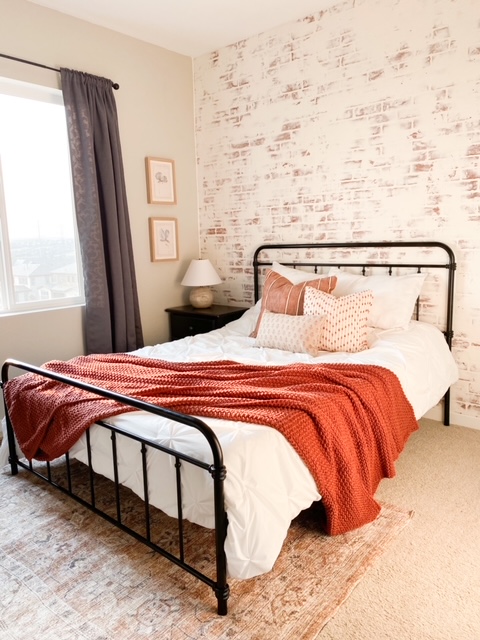
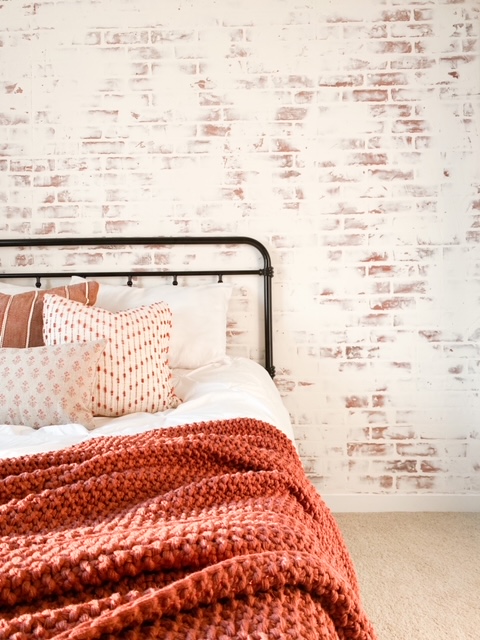
Unless you are within a couple feet of the wall, you would never know it isn’t real brick! The German schmear look really helps disguise the faux paneling!
Last, you are going to want to caulk around the sides and ceiling. It really helps finish off the wall and give it a seamless look!
The easiest way to caulk is put a eraser size bead of caulk down the seam (making sure the whole seam gets filled and there are no holes) and use your finger to press it down and slide your finger slowly down the seam.
It takes a little practice but it is relatively easy and quick to learn!
Overall, I am super happy with how this brick accent wall looks in our guest bedroom! It adds to much texture and warmth to this room!
Adding a textured accent wall to a bedroom (like brick, shiplap or board and batten) can make the biggest difference in making the room feel custom!
I try to add some type of texture to each room of my house! I have board and batten in both our office and Skyia’s bedroom, shiplap in our master bedroom, entryway and dining room and both brick and shiplap on our fireplace in the living room!
We still have a few things left to do in this room including getting a roman woven window shade (similar to the ones we have in our living room and ditching the gray curtains we currently have in here).
We also plan on painting the room a creamy white. Which will look so good next to this brick wall!
Even though we have more to do in this room, I am so happy to be one step closer to it being completed!
I have been wanting to do a DIY faux brick accent wall in my home for a long time! I am so happy we finally found the perfect space to do it!
Let me know in the comments what your favorite way to add texture around your house is!
Shop This Post:
Other related posts that you may be interest in:
- The 14 Best Boho Dining Room Rugs of 2021
- Affordable Farmhouse Dining Room Tables
- How to Make a Concrete Dining Table
- 6 Easy & Affordable Small Bathroom Makeover Ideas
- 8 Easy Ways to Transition Your Home From Summer to Fall
This post shared 3 simple steps to DIY a faux brick accent wall with german schmear!
Looks amazing!! Love it!!
Thank you so much Amber!
This looks great! How does the wall feel with that paste on it?
Thank you! And it feels like it looks, a little rough but not too bad!
Love how this turned out!
Thank you!!
Wow I love the brick wall! It looks great! The bedding is so cozy too!!
Thank you so much! It is so crazy how a pretty accent wall can help the bedding stick out!
I love this! It turned out amazing! So how do I get you two to come spruce up my house hahahaha. Thanks for the inspiration!
Haha!! Thank you!!
It seriously looks incredible!!!
Thank you!!
I love how this turned out! I feel like this is a project my husband and I could do!
You totally could do it! It was definitely one of the more simple DIY projects we have done!
It’s gorgeous! Great job and thank you for sharing.
Gosh I LLLOOOVVVEEE a good faux brick wall!!! All the heart eyes!
Thank you!!
Incredible transformation! Adding this to my hubby’s to do list
This looks amazing and fairly doable! I love how the bedding looks with it!
Looks so great!
I want this but in an office space… this probably isn’t considered renter friendly?
Turned out sooo good! You can’t even tell it’s faux, it looks like it’s real and has always been there!!