I’m sharing how we updated our outdated 1970’s Bathroom into a Fun, Colorful Boho Bathroom!
One of the first projects we did when we moved into our tri-level fixer upper home, was this colorful boho 1970’s bathroom remodel! This bathroom is the biggest in the house (I guess the builders in the 70’s really didn’t like the idea of big bathrooms!) so we knew it would make the biggest impact to remodel this bathroom first. The bathroom is also right up stairs from the kitchen, so it is easy for our guests to access.
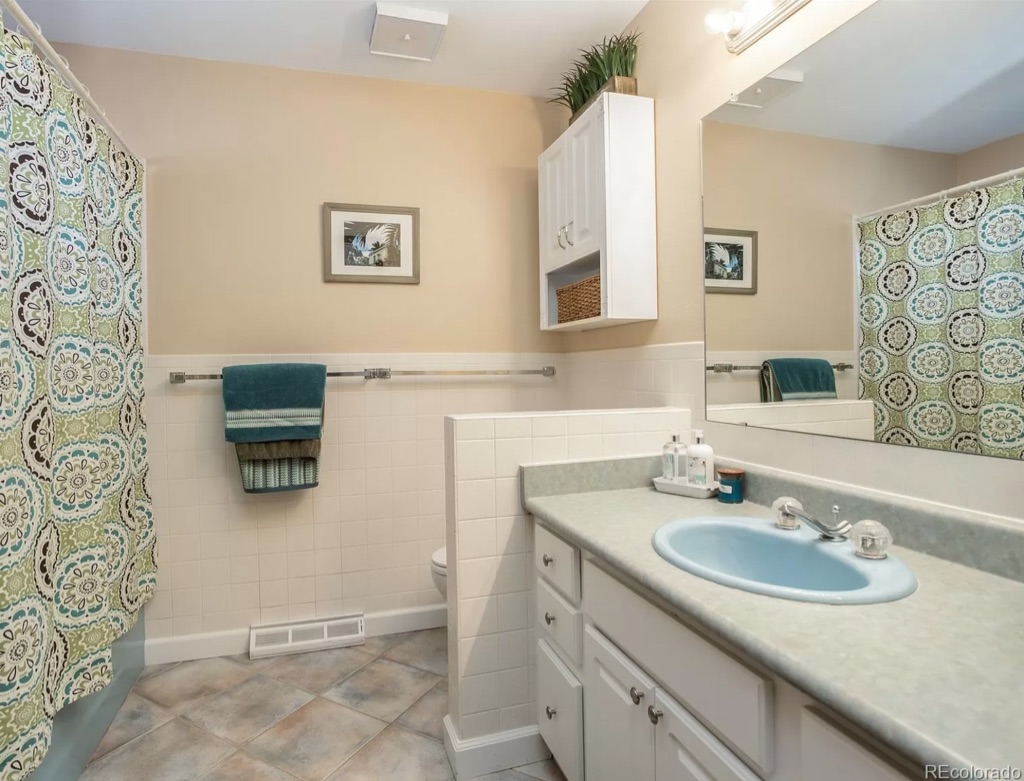
I don’t think this bathroom had been touched since the 1970’s! It was a good size, but needed major help! And as much as my son loved the baby blue bathtub and sink, we knew it had to go.
I’ve been working on so many DIY projects lately and have been having so much fun with them.
Below I’m sharing all about how we transformed this dated 1970’s Bathroom into a fun and colorful boho Bathroom for our kids!
This post contains affiliate links; see our Disclosure here.
1970’s Bathroom Remodel – Before & After
VERTICAL SHIPLAP:

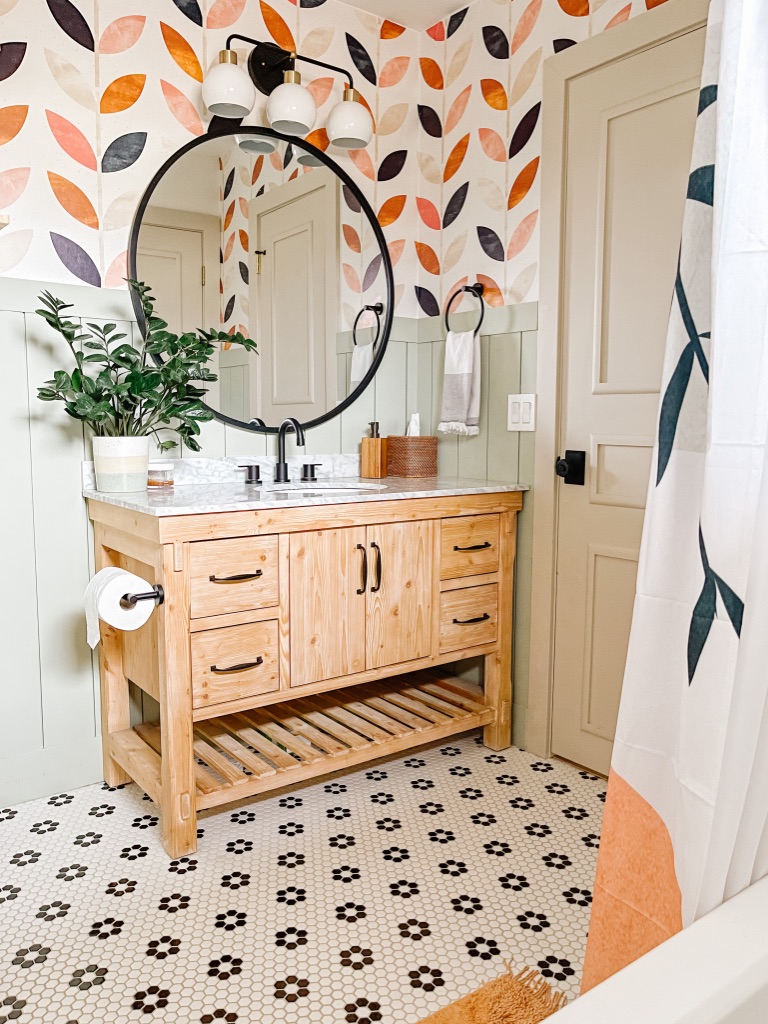
I knew that I wanted to make the walls really fun and colorful in here! In general, I love when I can keep the main fixed finishes in a space pretty neutral and timeless, but then add color and fun patterns to other areas in a room that can more easily be changed later! In this case, we kept the bathroom floor tile, shower wall tile, and vanity more neutral, and had some fun with the walls! We can always re-paint the walls later if we want a change!
Paint Color: Behr Urban Nature
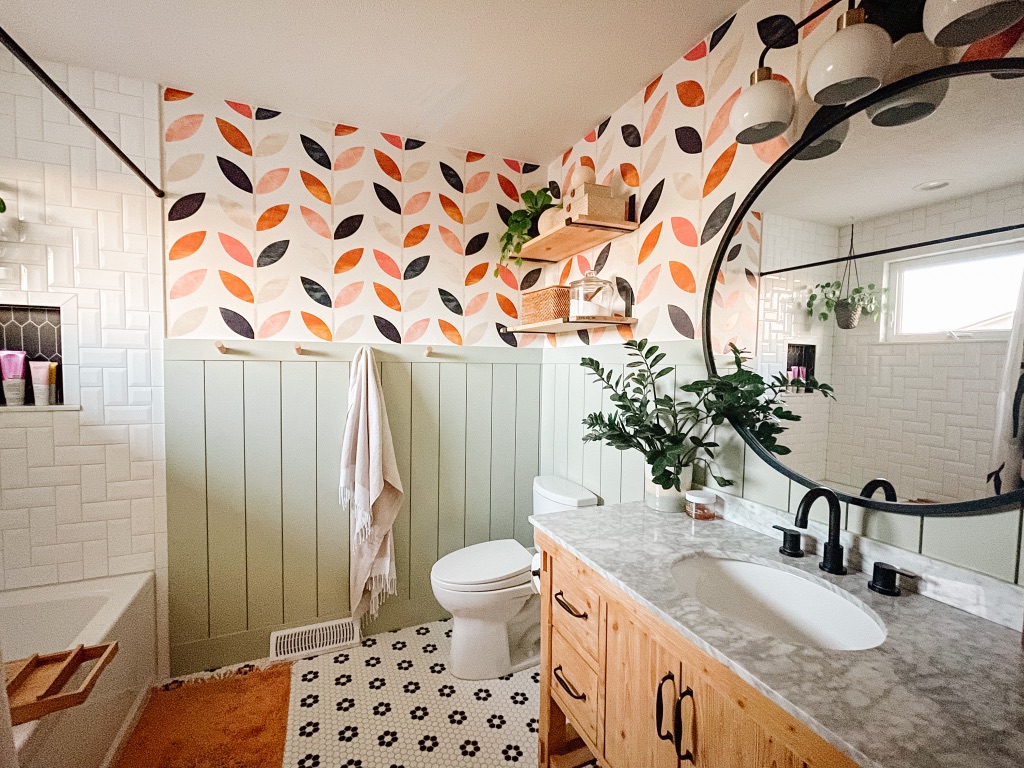
We decided to add a half-height vertical shiplap accent to the walls, to add some texture, and also draw your eye up. Being a 1970’s home, the ceilings through out our home are lower (8 feet) so I like to add vertical elements to the rooms to make them appear taller.
I wanted to add some cute wood peg hooks to the top of the vertical shiplap, so we chose a height that would work for the hooks, and so my young kids could easily reach them! The top of the shiplap is 57″H. The hooks are hung at 55″ high.
For the shiplap, we used 6″ wide boards. We added a 1×6 board for the base trim, and a 1×4 board at the top. It worked out perfectly to use 8′ long shiplap boards and we cut them in half so they were 4′ long, so we had minimal waste.
COLORFUL WALLPAPER:
Adding some fun and colorful wallpaper in here was another design aspect that I knew I wanted to include right away! I love how we chose to do the vertical shiplap on the bottom half of the wall and the wallpaper above it. This allowed me to choose a fun patterned wallpaper without it feeling too overwhelming.
I searched for HOURS to find the perfect peel and stick wallpaper for this room! Since this bathroom is technically for my two boys, I wanted something that was fun and playful, and gender neutral. I immediately loved this scandi wallpaper when i saw it! It is fun and playful, the colors were perfect, and it plays off of the 1970’s vibe from the original bathroom.
This wallpaper is peel and stick, so it was simple to install and to remove if we ever what to swap it out!
I love how we could paint the vertical shiplap a different color, and change the wallpaper, and it would feel like a new bathroom!
CHECK OUT THIS POST FOR MORE BOHO WALLPAPER OPTIONS!
A FUN TWIST ON WHITE SUBWAY TILES:
As I mentioned, I like to keep the hard fixed finishes neutral and timeless. It is harder to change the floor and wall tile, so I like to pick something that I love but that will work with different styles and something I won’t be tired of in a year.
White subway tile is something that really doesn’t get old. I know it is everywhere, but people use it everywhere for a reason – it is simple and timeless, and AFFORDABLE! It can really work in any bathroom style too; from modern to rustic.
I went with this Beveled 3 x 6 White Subway Tile from Jeffry Court because I liked how the bevel added some additional depth.
Also keep in mind that there are so many different patterns that you can install a white subway tile! A running bond pattern is the most common, but don’t be afraid to play around with other options!
We decided to install our tile in a herringbone pattern. Again I like how it is a simple change that makes it feel a little different.
We used a light gray grout for the shower walls. I didn’t want white grout, because it is harder to keep clean, but I wanted something a little softer than black so it didn’t feel too busy.
ACCENT TILE SHOWER NICHE:
At the last minute we decided to add a shower niche, and I’m so happy we did! Shower niches are so useful for storage, and they are also cute! I love adding a fun accent tile at shower niches!
Luckily I was able to find an in stock tile option that I loved at Floor and Decor. I love that it adds a pop of black to the shower (same as the plumbing finish). It is a simple picket shape tile, so it works well with the subway tile!
The size of our shower niche is 13″W x 15″H x 4″D. You want to make sure your niche is at least 36″ high off of the shower floor. Most are anywhere from 36″ to 60″ high, so decide what is comfortable for you. You’ll also want to make sure it is tall enough to fit your shampoo bottles! I usually buy bigger bottles with pumps on the top so I measured mine before we built it to make sure they would fit. 15″ tall is typically a safe height!
There’s a marble slab piece at the bottom of the niche, which you can typically find at a tile store (look for window sill pieces).
Basic 2×6 subway tile bullnose trim was used to frame out the shower niche.
We used the same light gray grout color to tie it all together.
We also included these glass shower shelves on the opposite wall for additional storage! They work great and have a minimal look.
PENNY TILE BATHROOM FLOOR:
I’ve always loved the look of penny tile bathroom floors! I think they are so cute and classic.
We went with a classic black and white floral penny tile design, but you can design so many different patterns, add borders, or even add words into your floor! The penny tiles can be so much fun to play around with.
We used the same light gray grout at the floor tile to keep everything cohesive. I will say though that I wish we went slightly darker with the grout at the floor, because it would be easier to clean.
NATURAL WOOD VANITY WITH MARBLE TOP:
This 48″ vanity was a bit of a splurge, but I fell in love with it! I really wanted a natural wood vanity in here, since the other finishes were either black and white, or very colorful. I felt that the natural wood finish would add some warmth in here! It was very hard to find an affordable natural wood vanity, but I’m very happy with the one we got!
At 48″ wide, this vanity is a great size with a good amount of countertop space and storage. We technically could have done a double sink vanity in here, but I preferred having more countertop space over the double sinks. They do make a 55″ version of this vanity too that I would have preferred, but it was out of stock at the time. 🙁
If you love the style of this vanity but need a different size, or want double sinks, CHECK HERE because it comes in multiple different sizes and finishes. Just a warning, it does go out of stock often, but it comes back and you can add your email to be notified when it does.
I also loved that this vanity came with the marble countertop, and sink included.
UPDATED MATTE BLACK PLUMBING & BATH ACCESSORIES:
We went with a matte black finish for all of the plumbing fittings and bath accessories in this bathroom, to tie in with the black tile at the shower floor and the shower niche. I love a matte black finish for plumbing; I think it is classic and modern but still casual.
For the shower and bathtub fittings, we used this Delta Trinsic Shower Faucet Trim Kit and this Delta shower head with attached hand shower. It is great quality. I think a hand shower option at the shower head (or a separate hand shower) is so necessary – for cleaning, giving the dog a bath, rinsing the kid’s hair, watering the hanging plant in there … we use it all the time! Make sure to also purchase the corresponding shower valve.
For the sink faucet, I almost bought the matching faucet from Delta, but then found this affordable sink faucet from Amazon! It looks so similar but was 1/4th of the price, and it has held up great. A sink faucet is definitely an item you can save on. We’ve purchased multiple “knock off” faucets on Amazon and they have all been great.
I also purchased some basic and very affordable bath accessories off of Amazon – like this toilet paper holder, and this towel ring.
DEEP SOAKING TUB:
This bathroom is the only one in our house that has a bathtub, so I definitely wanted one that I could use! We didn’t have room for a large free-standing bathtub, but you can still find some great deep options that work for a shower/tub combo set up!
This Kohler Archer bathtub is the perfect size and so comfortable! The kids love it, and I love it! It is deep and has a little ledge for your arm to rest comfortably. I highly recommend it!
OVERSIZED ROUND BATHROOM MIRROR:
I love how this Oversized Round Bathroom Mirror looks above the vanity! It is 37″ in diameter and is the perfect size for the 48″ vanity. I also like how the black frame ties in to the black plumbing fittings and hardware.
1970’S STYLE BATHROOM VANITY LIGHT:
I thought this bubble vanity light was so much fun! It gave me a 1970’s vibe, perfect with the wallpaper. The black ties into the plumbing and then I thought the mix of gold and white was fun and different.
BATHROOM DECOR AND ACCESSORIES:
The decor in this bathroom really helped tie everything together! After deciding on the wallpaper I wanted to make sure the shower curtain and the bath mat related well to it. I feel like I really lucked out finding these options! The colors match perfectly!
This boho shower curtain from Society 6 really pulls in the colors from the wallpaper and goes perfectly with it.
I actually ordered the shower curtain first before deciding on a green color for the vertical shiplap. Paint is the easiest thing to select a color for in a space because there are countless options, so it is always the last finish I pick. I wanted to make sure the green on the shiplap worked well with the green in the shower curtain.
Next I found this terra cotta bath mat from Urban Outfitters! Again the color worked perfectly in here and I love how the terra cotta color looks against the black and white tile floor. I also love the size of this bath mat – it is 20″L x 50″W and looks perfect in front of the bathtub.
We installed 4 of these wood peg hooks at the top of the vertical shiplap, in place of a towel bar. They are easier for my kids to use and I love the look of them. The natural wood finish also ties into the vanity.
The last bathroom decor piece we added were these floating wood shelves above the toilet. We’ve made these DIY floating shelves multiple times because they are so easy to make and look great! These are the 12″ deep shelf brackets I always use. You can find them in a few different depths as well.
They are the perfect place to store bathroom essentials like bath salts, bath bombs, extra wash clothes or toilet paper! I also usually keep a few decor items on them like decorative baskets and plants.
Check out the DIY Floating Wood Shelf Tutorial HERE! And while you’re at it, check out my 5 tips to perfectly style your shelves HERE!
SHOP THIS BATHROOM:
I hope you love this Colorful Boho 1970’s Bathroom Remodel as much as we do!
MORE REMODEL ARTICLES:
- 6 Easy & Affordable Small Bathroom Makeover Ideas
- Boy Bedroom Makeover with Simple DIY Board and Batten
- Update your Bathroom with these Bath Accessory and Decor Ideas
- How to Update an Old Metal Storm Door
- 8 Affordable Small Vanity Options & Small Master Bath Remodel
- Bathroom Design Plan and Vanity Light Options
This is honestly one of my favorite projects I’ve seen from you so far. The balance in this room is just perfect! Will definitely be using for inspo in my home!
Oh thank you so much! I really love how it turned out!
I’m just as obsessed with this bathroom as I was when you first posted it on Instagram!
Aw thank you!! I love it too!
That wall paper is so fun!
Thank you! I love the colors!
This wallpaper is so fun! It just makes me smile!
Same! I love how colorful it is!
Perfection!
Aw thanks!!
this makes me want to add all the color to my house – and usually I usually go toward neutrals. Love!
Bathrooms and small spaces are the perfect spot to add some fun color!
My favorite part of this bath is the floor tile!
Thank you! I love it too!
I’m just loving this!! Can I ask what color you painted the shiplap?
Thank you! The shiplap is painted Behr Urban Nature