This post is sharing how to DIY epoxy garage floors on a budget!
A couple weeks ago we finally got around to applying epoxy to our garage floor. We have lived here about 3.5 years now and this has been on my to-do list since day one! I am so glad we finally made the time to do it.
Honestly, that’s the hardest part about this project – finding the time! This is one of the easiest DIY projects we have done, but it did take 3 days to complete.
We set a whole weekend aside because we knew this was the case. I will go into more detail later on about why it takes 3 days.
This post contains affiliate links; see our Disclosure here.

So before I explain the process and materials you will need, I want to explain why we chose to DIY our epoxy floors instead of hiring someone to do them professionally.
Why we chose to DIY instead of hiring a professional:
The main reason is cost. I have seen professionals charging anywhere from $1,500- $3000 depending on how big your garage is and how much material is needed.
The total cost for us to do the epoxy garage floor ourselves was $366.
Plus all the time spent. Which actually only equaled to be 7 hours over three days, not bad in my opinion!
The second reason is because you can easily get all the materials you need at your local Home Depot.
I never realized how easy it was to find everything you need to epoxy your garage floor just like a pro. Home Depot makes it super easy and supplies most of the materials you need in one Garage Epoxy Floor Kit (don’t worry, I will share everything we used later).
Last, this project requires very little skill. Some of the DIY projects we do require you to be able to use a saw, a nail gun, or do math well (Ha! Thank goodness I have my husband for the math part)!
This one is as easy as cleaning and painting. If you can clean and paint, you can easily do this project!
Why is it good to epoxy a garage floor?
I am not a professional, but I will give you the reasons why we chose to epoxy our garage floor.
There are a few reasons why people choose to epoxy a garage floor.
Depending on where you live it can be absolutely necessary to epoxy a garage floor in order to keep the concrete in good condition.
We live in Colorado and get lots of snow in the winter (although not enough for my liking-ha)! Water and snow are concretes worst enemy. They make concrete crack, chip and fall apart.
There are several ways to help prevent concrete from cracking and this is one of them.
Epoxy is also good at protecting the concrete from chipping and wearing away.
Concrete can be very expensive to get replaced or fixed, so it is good to be doing preventable measures to try and make it last as long as possible.
The last reason is because it makes the garage looks so much nicer and cleaner! It’s amazing the difference it makes!
Materials Needed For Epoxy Floors
- Epoxy Garage Floor Kit
- Clear Garage Floor Top Coating
- Cleaner and Degreaser
- Concrete Patch and Repair
- Pressure Washer
- 2 inch Putty Knife
- Weed sprayer
- Scrub Brush
- Squeegee
- Paint Roller (2)
- Paint Brush (optional)
- 5 Gallon Bucket
- Deep Paint Tray (2)
- Razor blade
Simple 5 Step Process
Day 1
- The very first step is cleaning out everything in your garage. Then use a pressure washer to get all the dirt, dust and grime off the floors.
If you don’t own a pressure washer I highly recommend you buy one ASAP! This is the number one tool we use in our house!

We clean out our garage with our pressure washer at least twice a year, clean the sides of our house, clean the porch, spray down rugs and strollers. We literally use it to clean everything! Definitely a must have cleaning tool!
After you are finished pressure washing, you will want to use a razor blade to scrape any paint or glue off of the floor. You want the floors to be a smooth and flat as possible so getting up any gunk that is on the floors is important.
2. The next step is cleaning and degreasing your garage floor. All you need for this step is the Cleaner and Degreaser, a scrub brush and a 5 gallon bucket.
Wet the floors using your pressure washer, then dump some of the cleaner onto the floors and scrub well with the scrub brush.
You are going to do this in sections and get the floors as cleaned as possible.
3. Once you are done cleaning you are going to want to use the Etch that is included in the Epoxy Garage Floor Kit.
You will wet the floors with the pressure washer again. This time you will want to squeegee any excess water off.
Then apply the etch. You will want to use a weed sprayer to spray the etch onto the wet concrete.
Then scrub the etch into the concrete with the scrub brush.
Once you are finished you want to make sure you get all of the etch completely washed off using your pressure washer! This is very important because if you don’t get it all off then the epoxy will not stick to the concrete well.
The last thing you are going to want to do on Day 1 is fill in any cracked concrete with the Patch and Repair Kit. You will use a putty knife to fill in the cracks.
The Patch and Repair kit is super easy to use but takes some time to dry. So you will want to let it dry at least 8 hours before applying the epoxy.
At this point you want to let the concrete dry overnight.
Day 2
4. Once the concrete has dried overnight you can apply the epoxy! Follow the directions that comes in the Epoxy Kit on how to mix up the epoxy.
Then apply the epoxy by putting it into the deep paint tray and painting it onto the concrete garage floors in small areas.
My husband and I actually did this step together because while he painted on the epoxy I went behind him with the paint chips and threw those onto the wet epoxy he had just applied.
This step honestly went so fast!
You are going to want to let the epoxy dry for 24 hours before moving onto the next step.
Day 3
5. The last step is applying the Clear Top Coat.
This step literally took me 15 minutes to complete. You roll it on like paint, just like you did the epoxy. It really gives the epoxy a finished look!
Plus, it is supposed to make everything more durable and hold up to the snow and water better. Which is a must in Colorado!
That’s it! It is just 5 simple steps to applying epoxy to your garage floors!
FYI– The clear top coat doesn’t go as far as the epoxy. I ended up running out toward the very end when it said it should have been able to cover the square feet in my garage. So I would make sure to use a thinner coat or get two boxes! I started in the front and worked my way to the back of the garage. The back of my garage is missing the top coat but cars don’t drive all the way to the back so I am not worried about it!
Finishing our Garage Makeover
After we finished the garage floor I decided we should paint the walls and the door too!
I absolutely loved how much nicer our garage looked with the epoxy floors! But it didn’t look finished.
We are lucky and already had drywall up in the garage that the builder did. However, we did have to prime it before painting.
In order to paint onto drywall you have to use a drywall primer first! This prevents the drywall from soaking up all the paint.
So we first primed everything (including the ceiling). Then, we painted all of the walls but left the ceiling with just the primer! The primer was white but a brighter white. For the ceiling that was totally fine with me.
We used my favorite white paint, Alabaster by Sherwin Williams to paint all the walls in the garage!
Alabaster is my favorite because its more of a creamy, warm white. We could have left all the walls with just the primer since that was white too, but I wanted a more creamy white so we decided to paint!
Alabaster is also the white that I have everywhere you see white in my house. Rachel also has Alabaster all over her walls! It’s a good white!
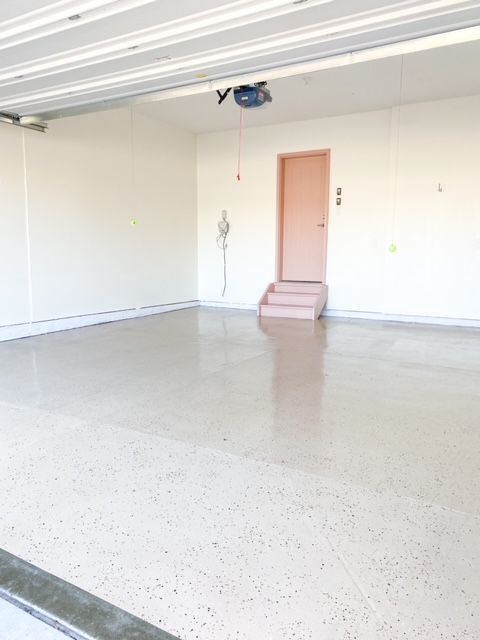
The Pink Door
I was really wanting to do a fun color for the door and steps here in the garage.
I was debating between yellow, blue, green and pink. I settled on pink even though my hubby was a little hesitant – ha!
But he ended up loving the pink I chose. It is not a bright pink, more like a clay pink. It is gorgeous in real life! Now I want to find a spot in my house to use it too!
The door color is Art Deco Pink by Behr.
When I come home now the pink door makes me so happy. My mom makes fun of me for saying that. So every time she comes inside she yells “that pink door just makes me so happy!” haha!
Everyone on Instagram LOVED the pink door too! I was already in love with it but it always makes me feel good when we get an overwhelming positive response on a project we do!
If you don’t follow us on Instagram yet make sure you do (click here)! We have so much fun in stories and we love getting to know our followers through messaging!
Other related posts that you may be interest in:
- Colorful DIY Stair Risers with Peel and Stick Wallpaper
- DIY Faux Brick Accent Wall – 3 Simple Steps
- How to Make a Concrete Dining Table
- 6 Easy & Affordable Small Bathroom Makeover Ideas
- DIY Simple Slatted Wood Trellis
This article shared the 5 easy steps to applying epoxy to your garage floor!
Love the door 😍😍😍😍. Doing this is definitely on my to do list, thank you for sharing the details.
Thank you! So glad it was helpful!
I’m really glad I watched this unfold on IG and then read here in detail. When we get a house w/ garage I will most definitely epoxy my floors!
Thanks for following along on Instagram too! I try to show all DIY projects there too because I am a person who needs to watch it being done and not just read about it!
Oh this came out so good! My husband and I will definitely be doing this!
It is such an easy DIY! I wish we would have done it years sooner!
Love the way that turned out! I have been wanting to do the floors in our garage so now I may actually go for it! Do you think it would be possible to do one half of the garage at a time? We have so many tools and things in our garage I wondered about moving it all to one side instead of outside for 3 days. Thanks!
Hi! Yes, I absolutely think you could do one half at a time! The hardest part would be that it would take twice as long for dry time since you will have to wait for each side to dry. But it could definitely work! You would have to take everything out to pressure wash and all the other steps with water. But you can move the stuff back into the one side of your garage for the parts that have to dry for 24 hours (the epoxy and clear top coat).
The floors like so great!
Love the pink door. I own a condo, so I’m limited on what I can do outside, but I painted the interior of my front and back door pink and I love it so much.
I love how just painting a door a pop of color completely changes the feel of the space! I have done the same with my interior front door and pantry door!
I love how clean your garage appears to feel with the epoxy floors and painted walls. It’s the pink door is fun too!
Me too! It feels so much cleaner. even after putting all of out stuff back in!
Love that pink door!
Looks so good!
How have they held up? Thanks!
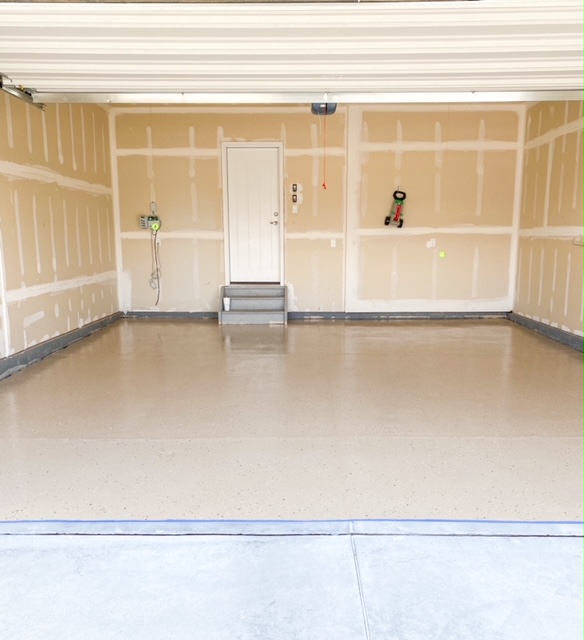
Did you lighten up the pic? The kit is beige but looks white. Maybe the color of the walls causes that effect? The walls are not white are they?
Hi, the walls are white, and the photos were slightly brightened. The floor is a light beige color.